MSA TMS — User Guide
A practical, end-to-end walkthrough of MSA's Transportation Management System for dispatchers, fleet managers, accountants, and safety teams. Every screen in the app is covered, with a screenshot and a short explanation of what to do there.
Overview
MSA TMS is the daily operating system for the carrier. It is organised around three big ideas:
- Boards — at-a-glance, action-oriented views of what's happening right now (where trucks are, which loads need attention, who's home, what's invoiceable).
- Main — the source of truth for the company's data: loads, drivers, trucks, trailers, and reports.
- Dispatch / Fleet / Accounting / Safety / Settings — specialised areas for the teams who own those workflows.
Most days, a dispatcher lives on the Load Board and the Loads page. A fleet manager lives on Repair and PM. Accounting lives on Invoicing and Expenses. Safety lives on Claims.
Map
See every truck on the road in real time.
Loads
Create, assign, status-update, and close every load.
Drivers
Onboard, manage payroll, track hours and assignments.
Fleet
PM schedules, repairs, fuel cards, photo control.
Accounting
Toll, fuel, and unit-level expense tracking.
Settings
Users, roles, integrations, and company setup.
Logging in
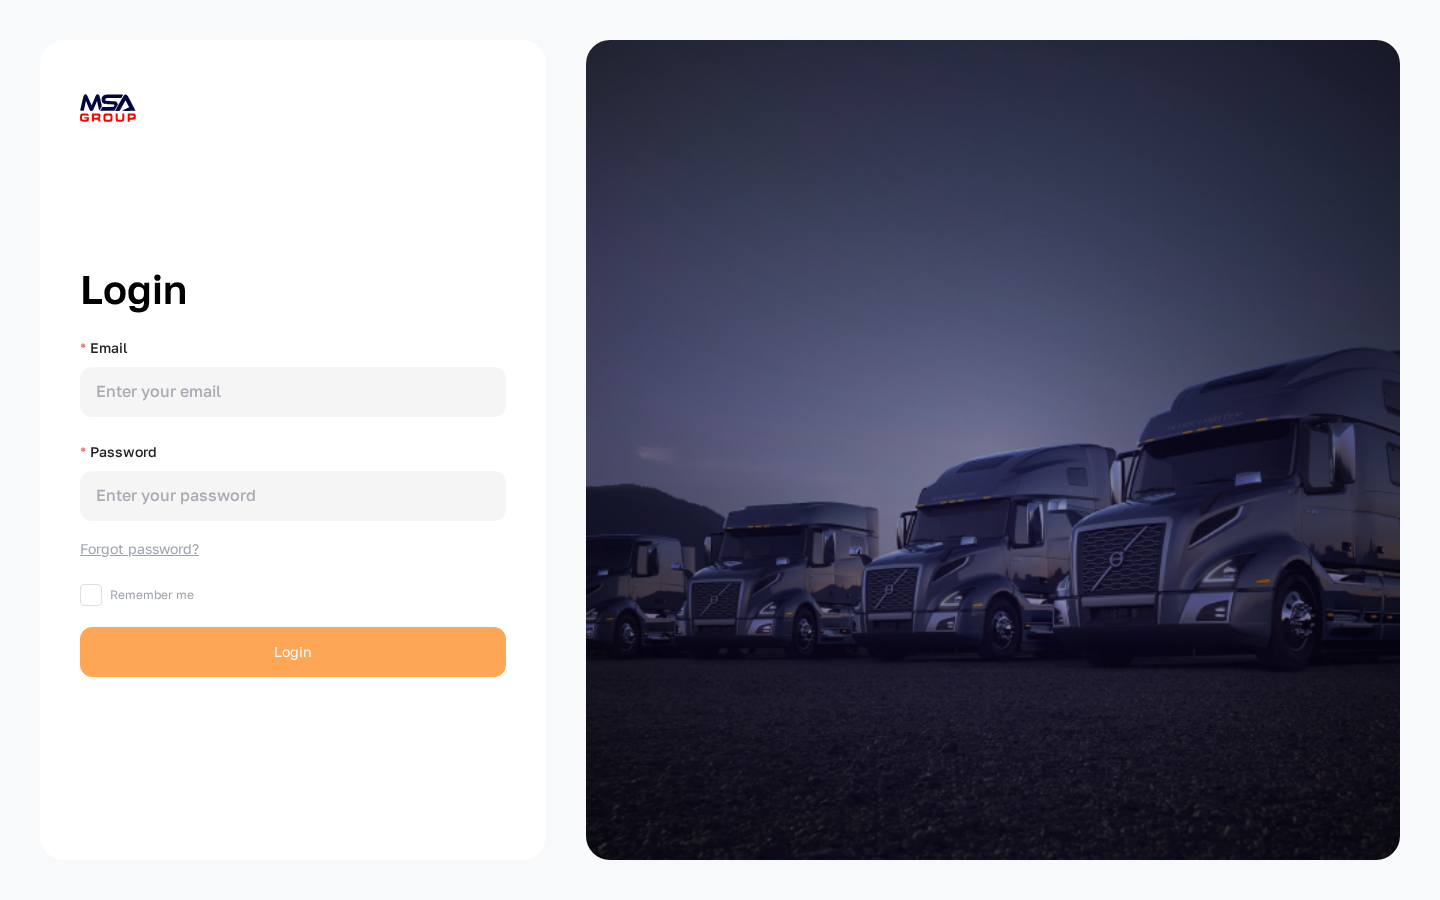
MSA TMS lives at app.tms.msagroupllc.com. Use your work email and password to sign in.
- Open the URL above in a modern browser (Chrome, Edge, or Safari).
- Enter your Email and Password.
- Tick Remember me if you'd like the browser to remember your email next time.
- Click Login.
If your account belongs to more than one carrier, you'll be asked to pick which one to work in for this session. You can change carrier later by logging out and back in.
Welcome dashboard
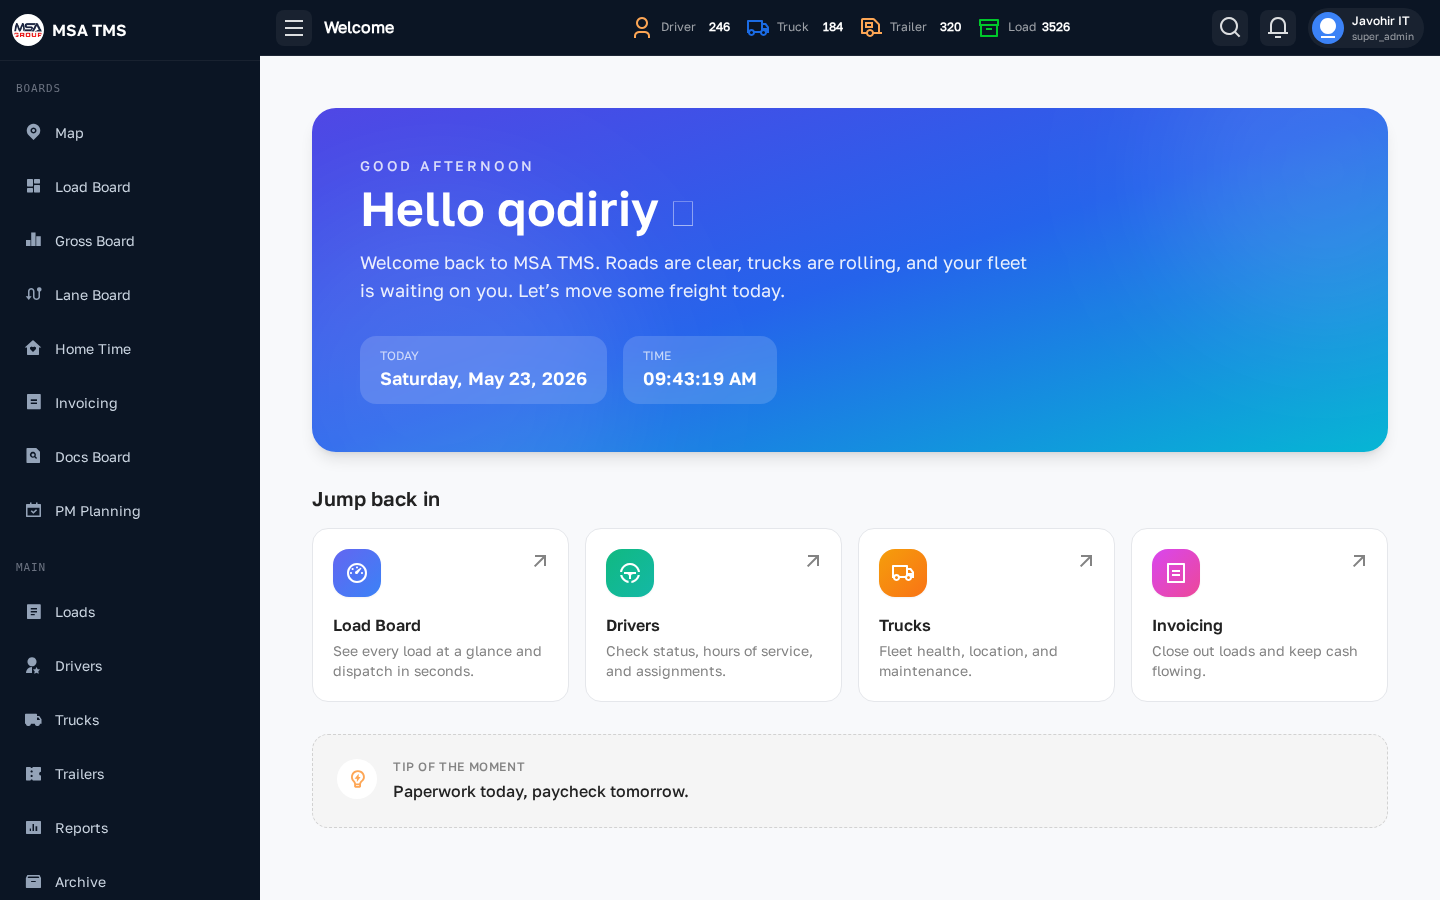
The first screen after login is the Welcome page. It greets you by name, shows the current date and time (Eastern Time), and surfaces a row of Jump back in shortcuts to the four most-used screens: Load Board, Drivers, Trucks, and Invoicing.
The top bar shows live counts of Drivers, Trucks, Trailers, and Loads so you can confirm the fleet size at a glance. Your profile menu is at the far right.
App layout
Every screen in the app uses the same shell:
- Left sidebar — your map of the app, grouped by area (Boards, Main, Dispatch, Fleet, Accounting, Safety, Settings). Click an item to open the page; the active item is highlighted in orange.
- Top bar — fleet counts, global search (🔎), notifications (🔔), and your profile menu.
- Main area — the page itself. Most pages combine filters on the top, a table or map below, and an Action column on the right of each row.
- Right drawer — when you edit a row (status, driver, truck, broker, etc.) the form slides in from the right rather than opening a pop-up dialog. Click outside or hit the Cancel button to dismiss.
📊 Boards
Boards are the operational dashboards — they pull live data from across the system and present it in the shape that team needs right now.
Map
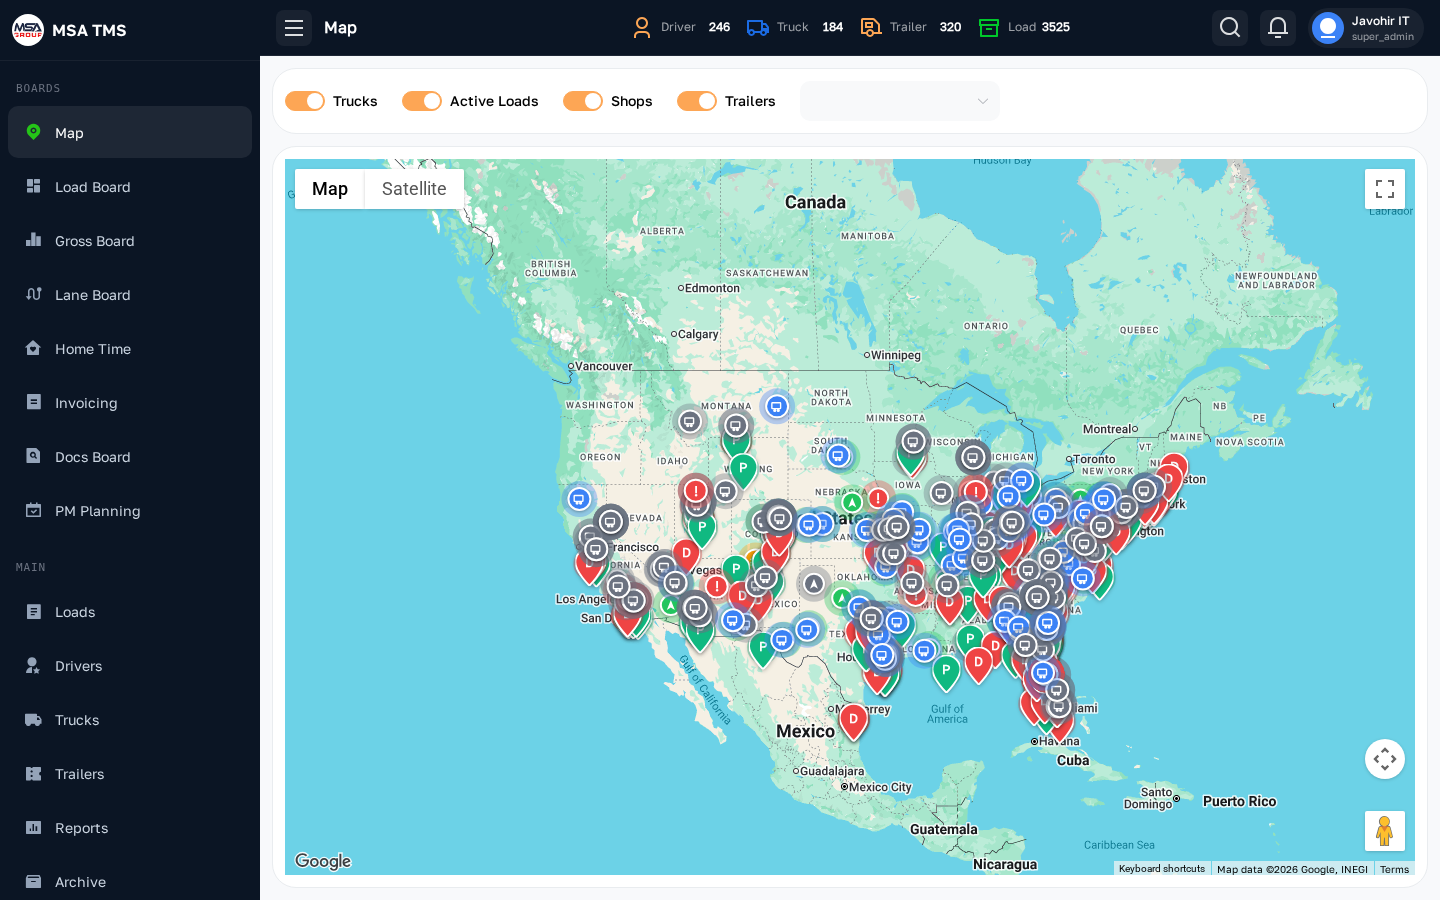
A live map of every truck in the fleet, with each pin showing the unit number, driver, current speed, and last update. Click a pin to reveal its route, recent stops, and any active load.
- Pan and zoom like any web map.
- Filter by driver, truck, or status from the toolbar.
- Lines drawn on the map represent ongoing trips, including pickup and delivery points.
Load Board
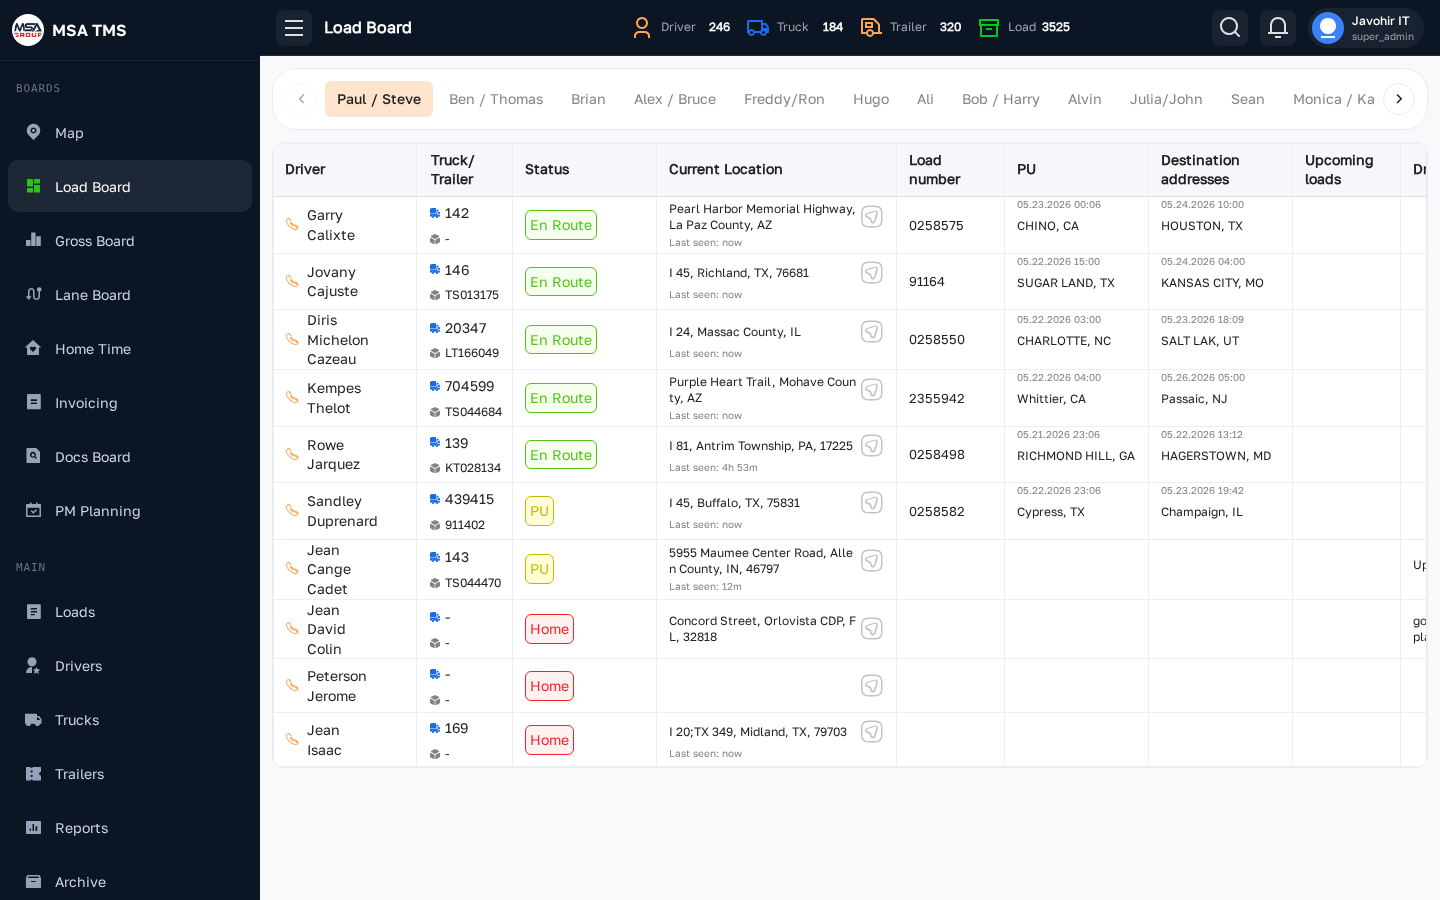
The dispatcher's home base. Every load currently in the system, in one table, with filters at the top for status, driver, truck, dispatcher, broker, dates, and more. Click any row to open the full Load detail page.
Load number
Each load carries a unique reference number (e.g. #8914446) displayed
in the top-left of the row and the detail view. This is the broker's or shipper's
order number — use it in every message, call, and document related to that shipment
so everyone is talking about the same load.
Load type
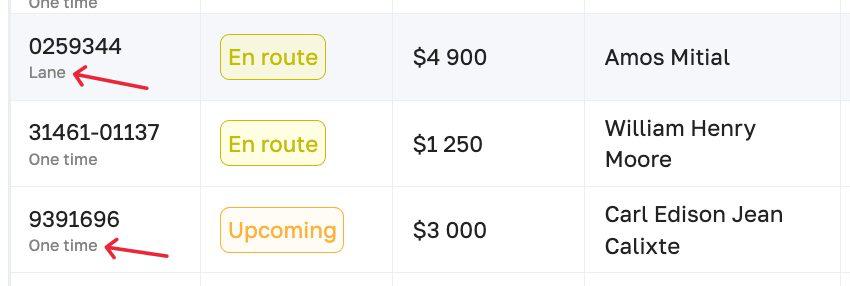
Every load is one of two types, shown just below the load number:
- One time — a standalone, spot-market shipment. Every field (rate, broker, route) is negotiated and entered fresh. Use this for loads that don't follow a fixed, recurring pattern.
- Lane — a recurring run tied to a saved lane in Dispatch → Lanes. The broker, base rate, and route are inherited from the lane definition, so the load is faster to create and less error-prone. Use this whenever you run the same origin–destination pair on contract.
- Use the column sort arrows to re-order by pickup date, delivery date, or rate.
- Inline status chips are colour coded — see Load statuses for the full legend.
- The filter bar at the top lets you narrow by status, driver, truck, dispatcher, broker, and date range.
Gross Board
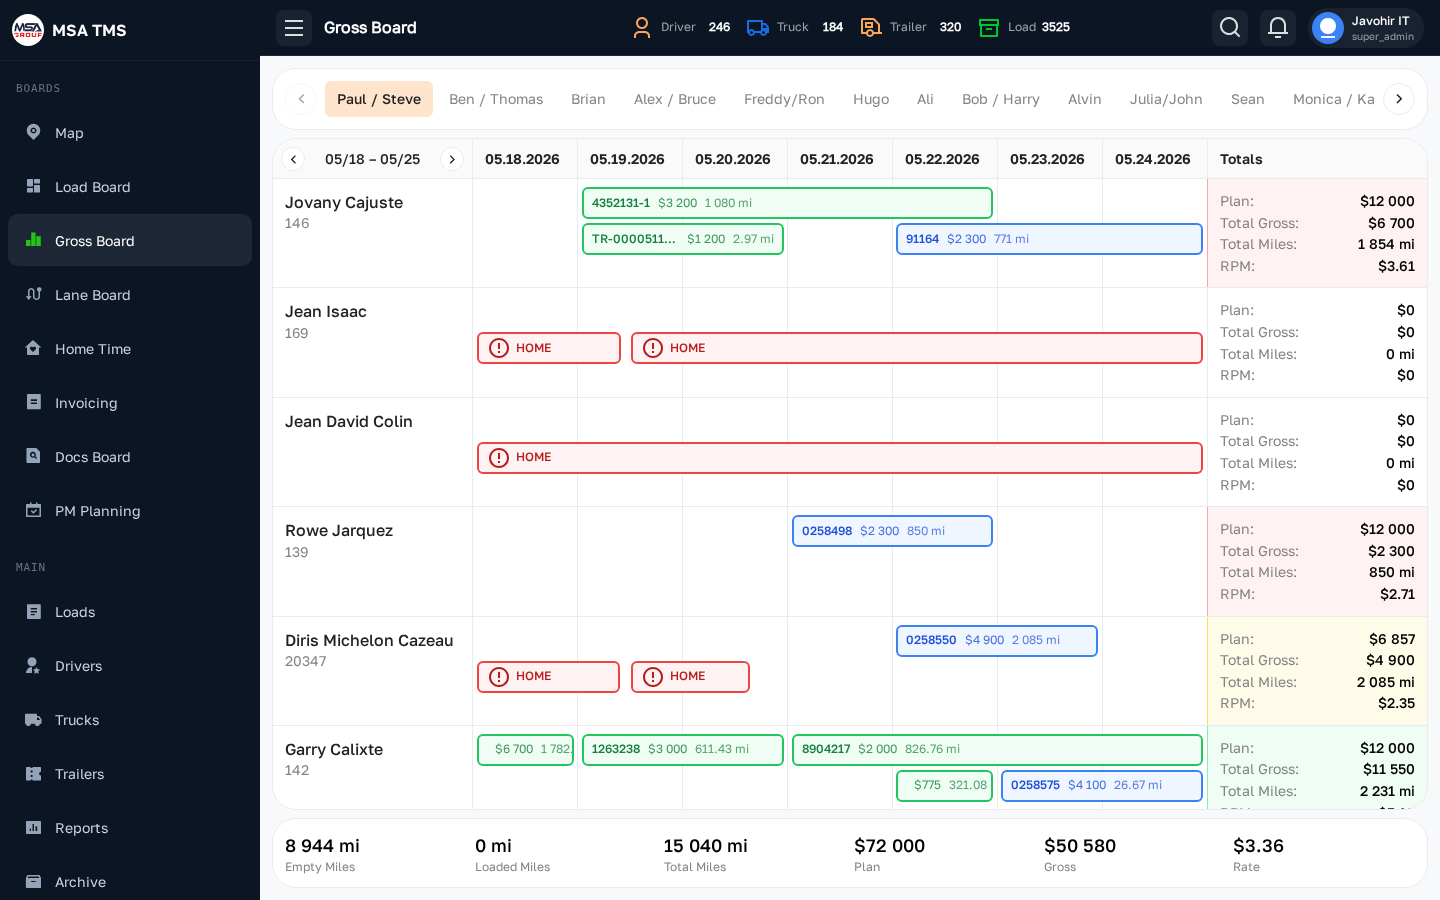
A weekly profitability scorecard. For each truck (or driver) the board shows total gross revenue, miles, rate per mile, deductions, and notes. The colours flag trucks that are over- or under-performing the threshold set in Settings → Gross Board.
- Switch between weeks with the date picker at the top.
- Click a row to expand the individual loads that contributed to the total.
- The notes column is shared with the dispatcher — leave a comment when re-classifying a load.
Lane Board
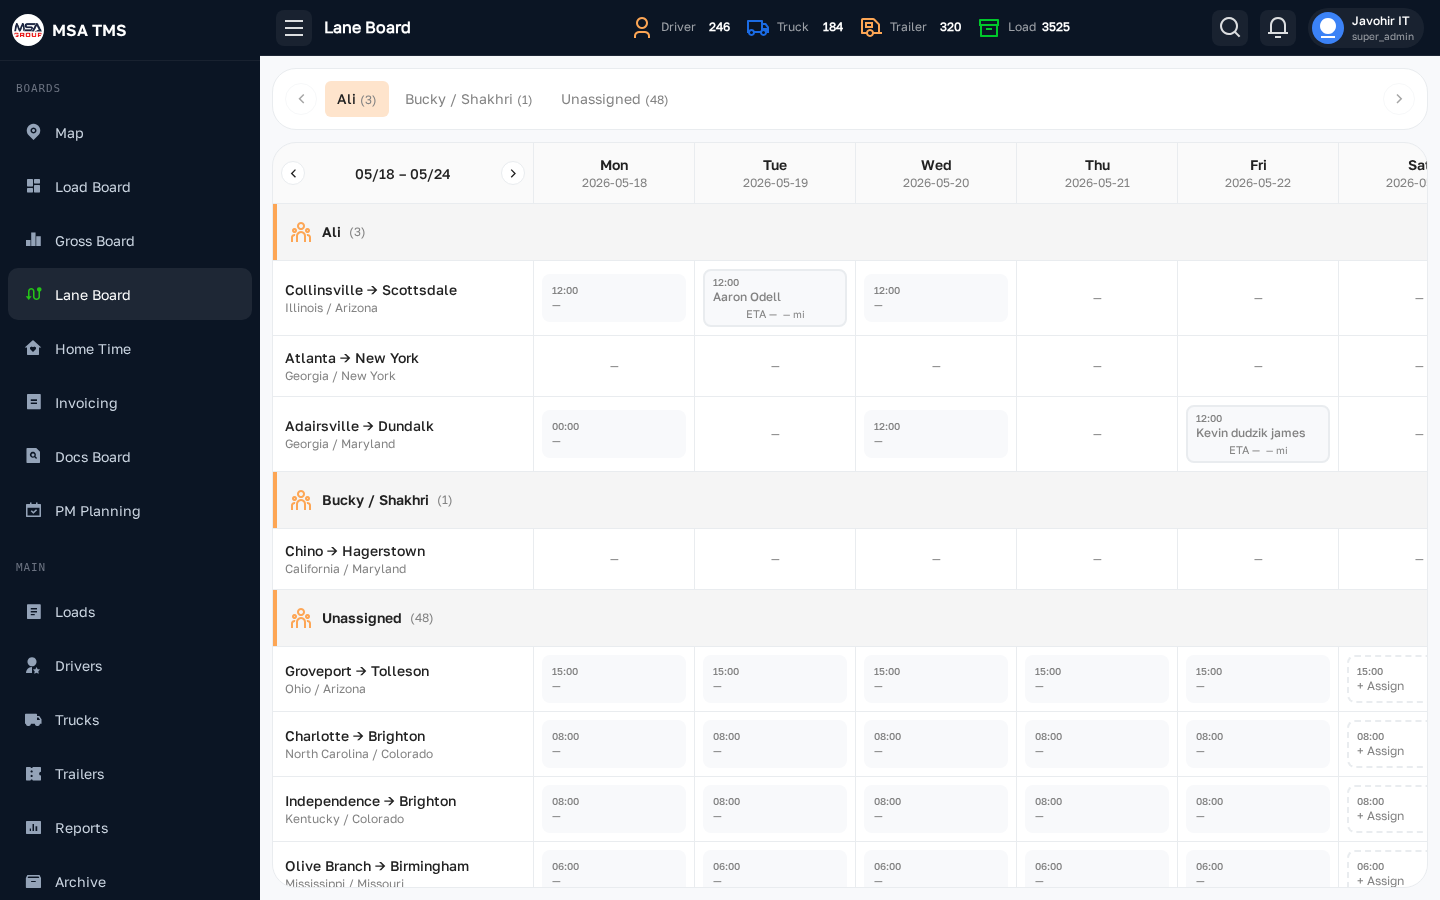
A view of your top-performing lanes (origin → destination pairs). Use it to spot where the company is making the most money per mile, where you have a backlog of trips, and where rates are dropping.
- Sort by gross, RPM, or trip count to find the most valuable lanes.
- Click a lane to see every load that ran it.
- Use the date filter to compare this month to last.
Home Time
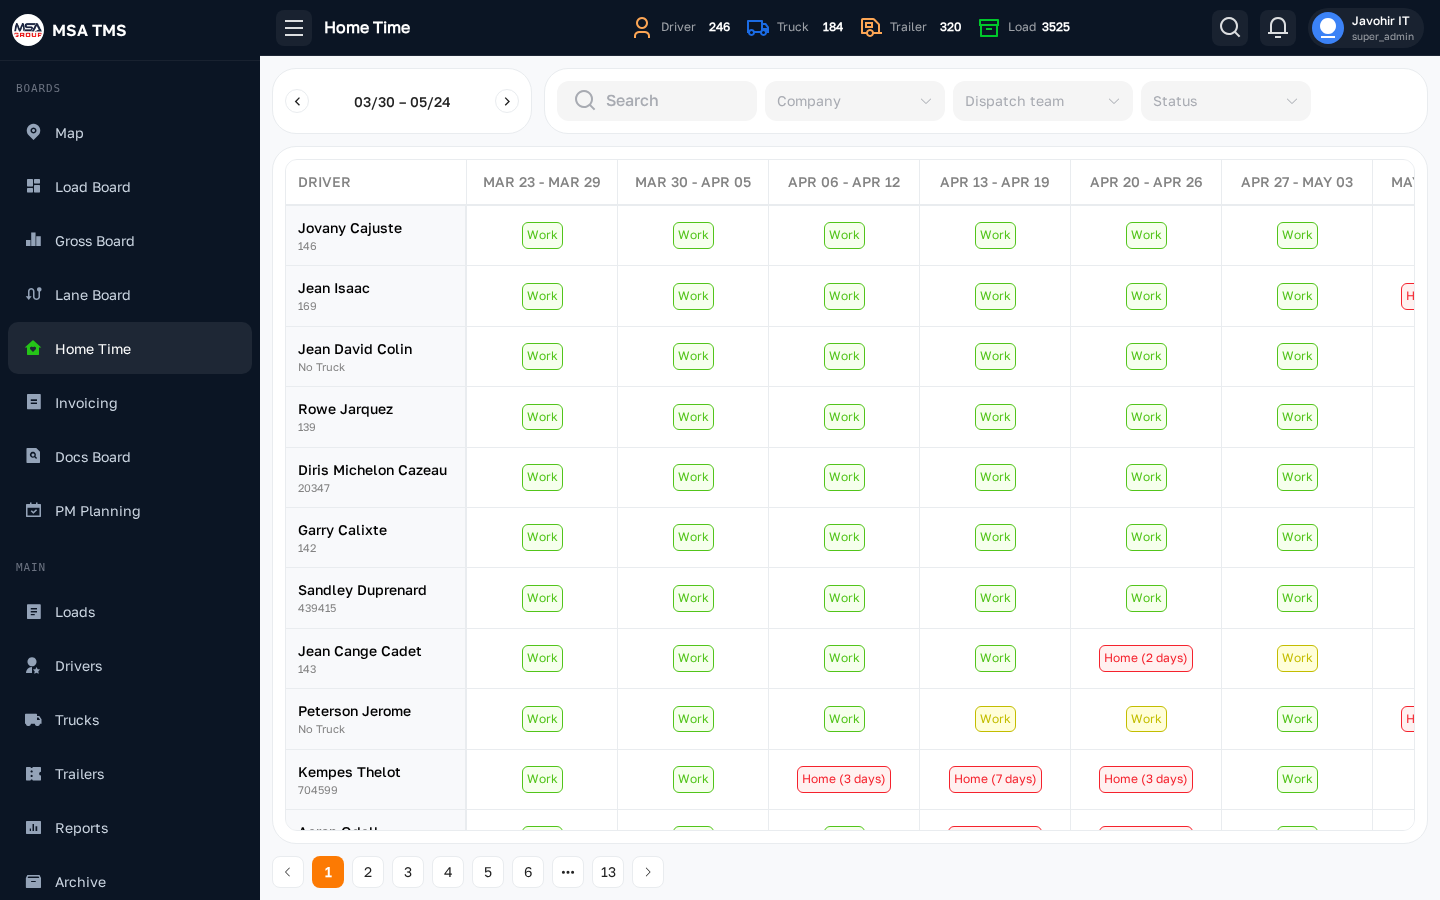
The driver vacation / home-time planner. Each row is a driver; the columns are days of the week. Use it to plan routing around drivers who'll be off, and to honour home-time requests.
- Click a cell to mark a driver as home / on the road / off.
- Hover for the driver's last and next planned home dates.
Invoicing
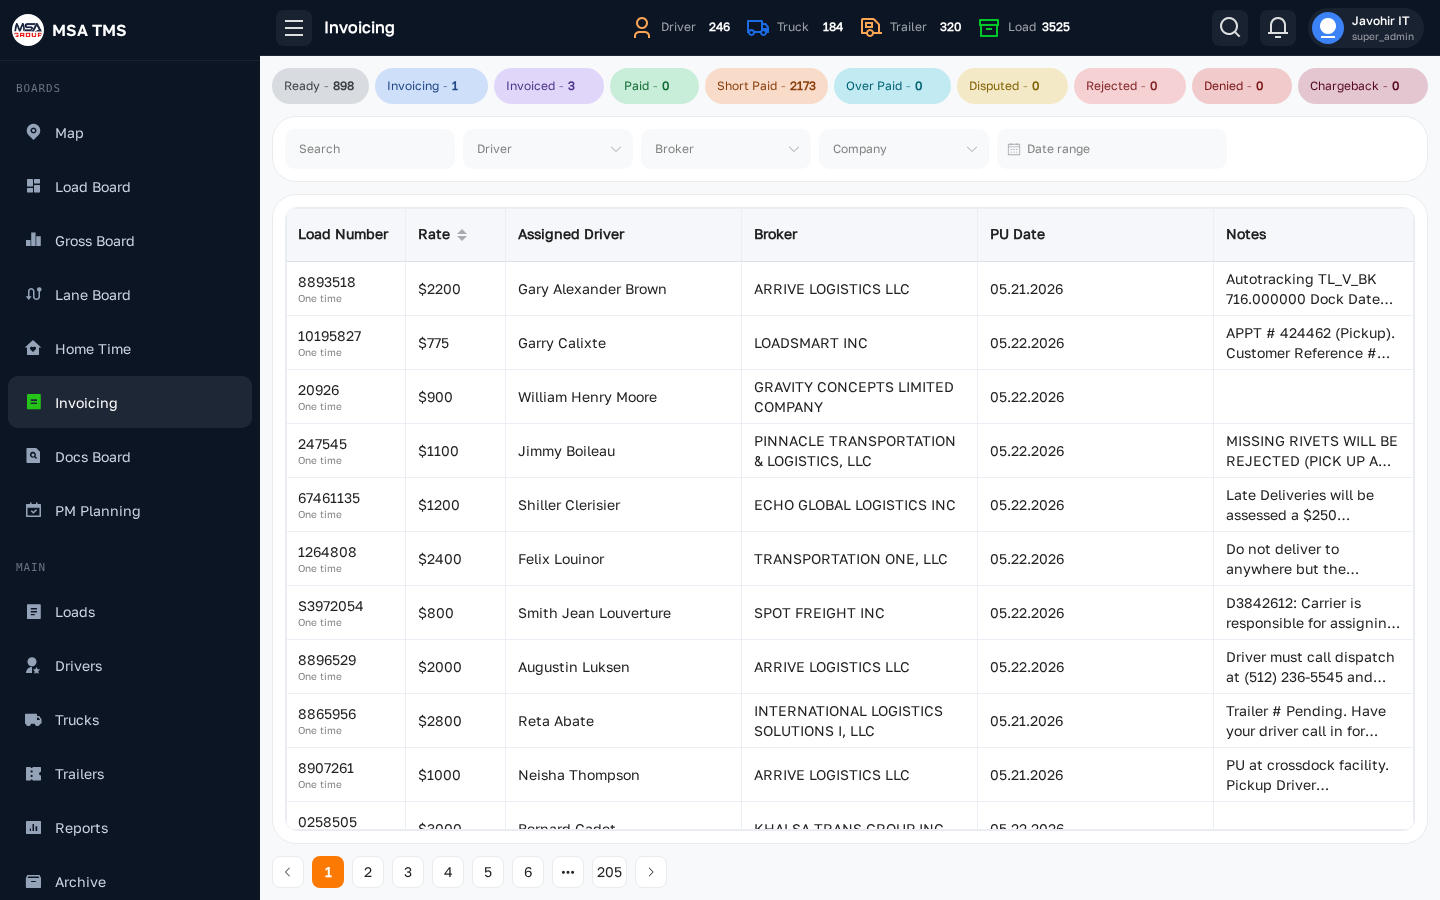
The accounting team's worklist for closing out loads and getting paid. Filter by broker, dispatcher, or invoice status (Pending, Invoiced, Paid). For each load you can review the rate confirmation, BOL, and any photo control evidence before sending the invoice.
- Send invoices in bulk by selecting rows and using the Action menu.
- Mark paid loads from the row's edit drawer — this updates the related Gross Board calculation.
Docs Board
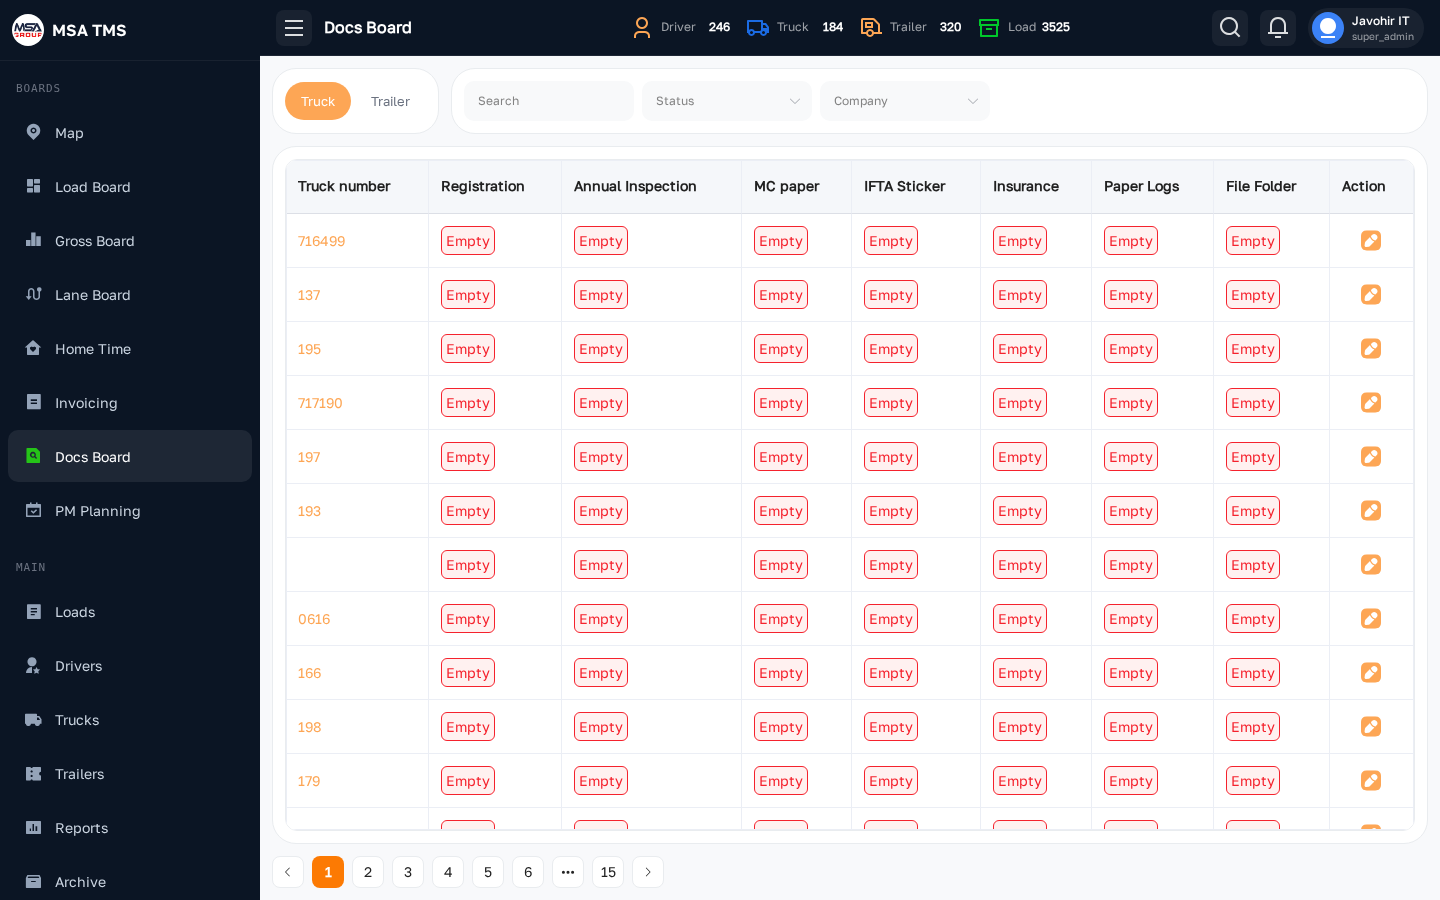
A documentation health board — for each load it shows what's uploaded and what's missing (Rate Confirmation, BOL, POD, lumper receipts, scale tickets, photo control). Red badges mean a document is missing; green means uploaded.
- Click a row to jump straight to the load's Documents tab.
- Use this board the day before invoicing to make sure nothing's missing.
PM Planning
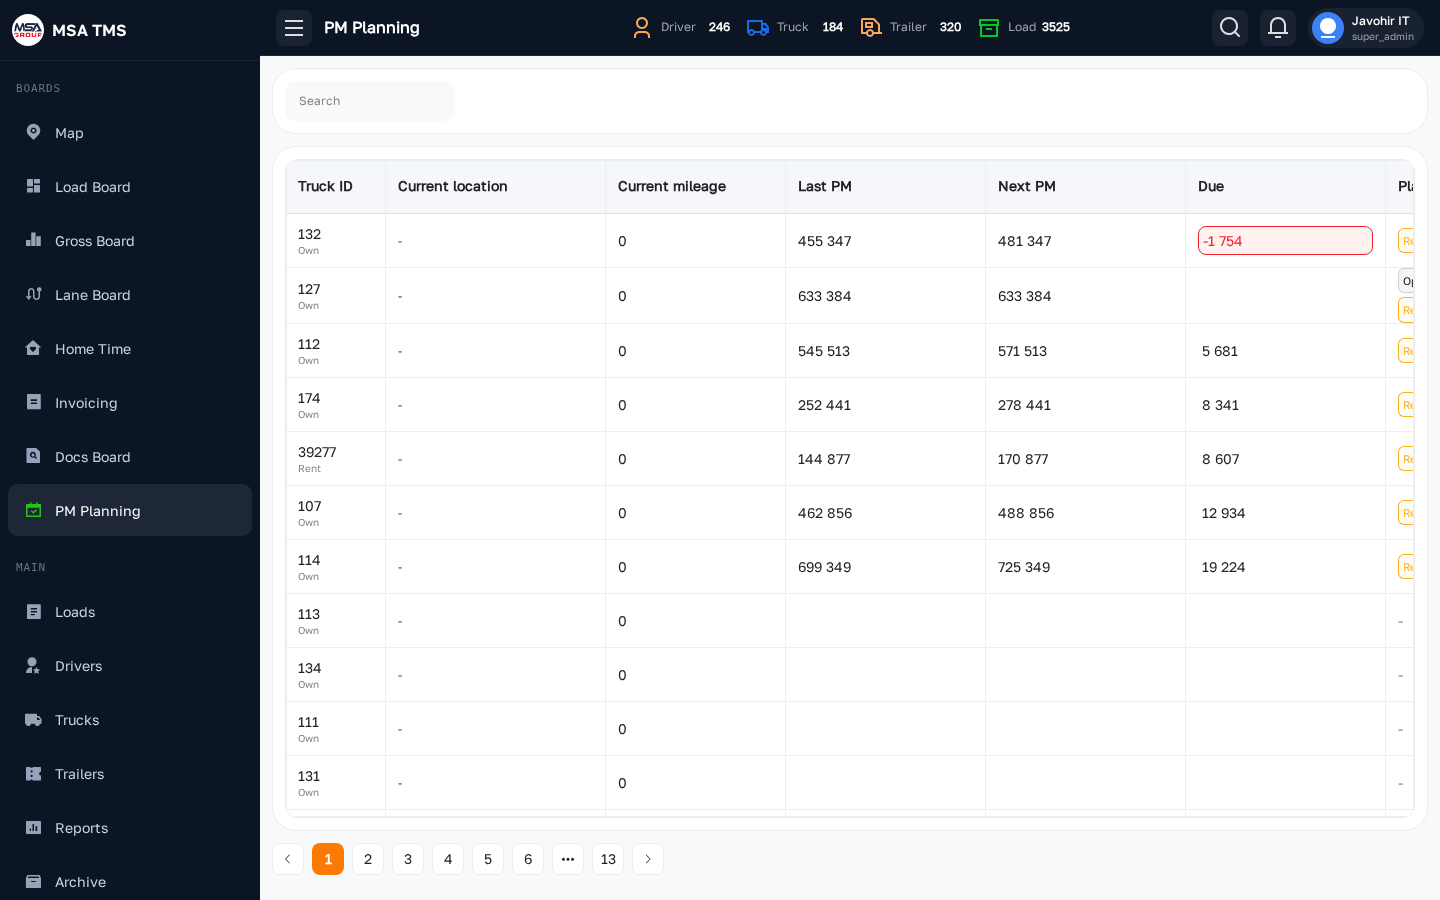
A forward-looking maintenance calendar. PM (Preventive Maintenance) schedules from the Fleet module are projected onto a calendar so you can plan which trucks come off the road in which week.
- Filter by PM type (A-service, B-service, DOT inspection, etc.).
- Click an event to open the PM record in Fleet → PM.
📁 Main
Main is where the core data lives. Anything you read in a board is created and edited here.
Loads
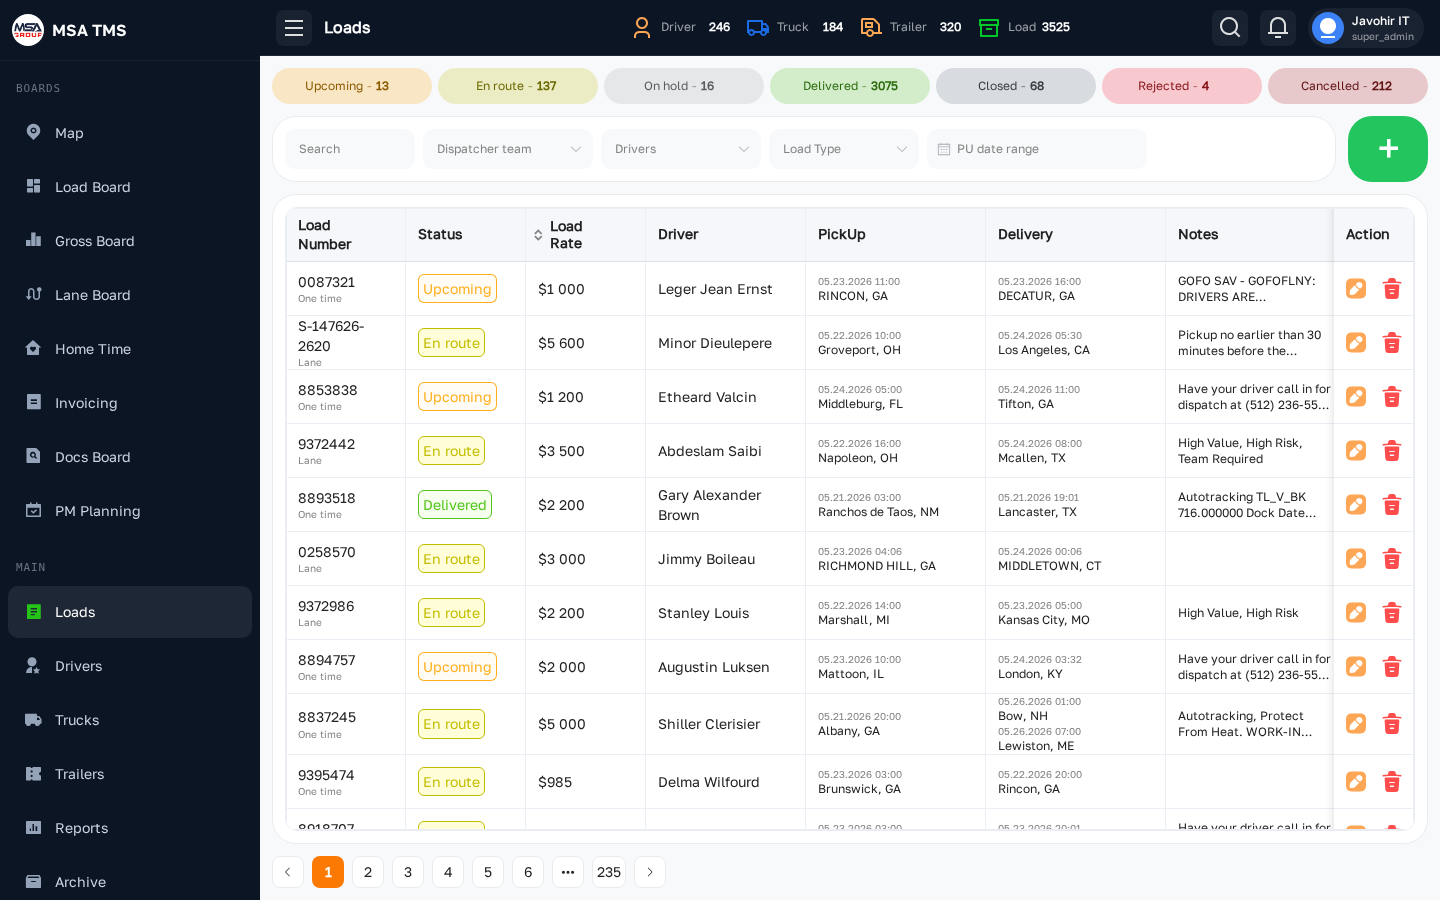
The full loads ledger. Create a new load with the + button in the top-right, search and filter existing loads, and click any row to open its detail view. The detail page is the most-edited surface in the system.
From the load detail page you can:
- Change the load number and type (One Time vs Lane).
- Change the load status (Upcoming → En Route → Delivered → Closed).
- Reassign the driver, broker, rate, and extra bill.
- Review documents — RC, BOL, POD, and Invoice.
- Upload documents — attach files to each slot directly from the Documents tab.
- Review the full edit history in the Log tab.
Load number
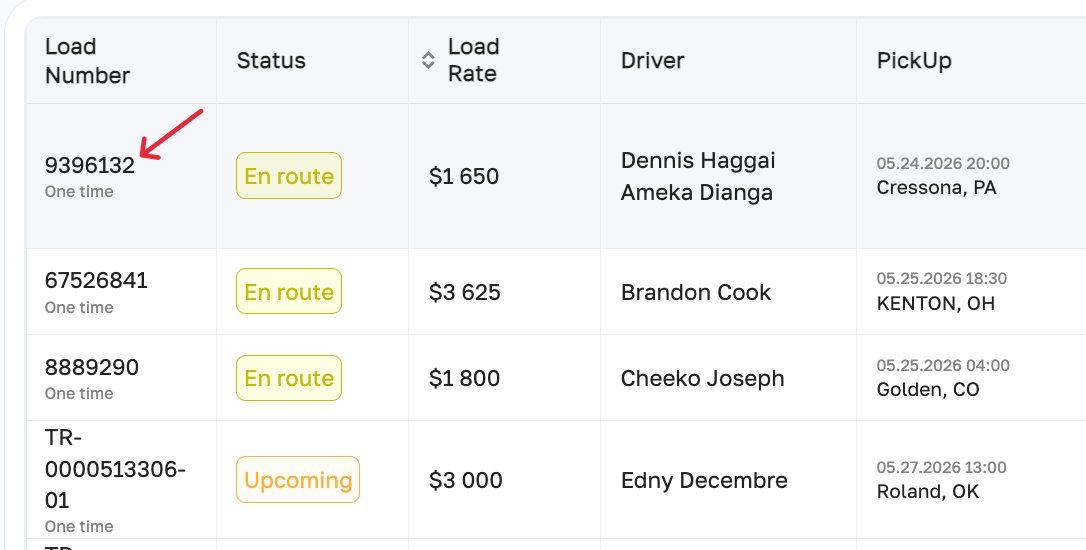
Each load has a unique reference number displayed in the first column of the Load
Board (e.g. 9396132, 67526841). This is the broker's or
shipper's order number for the shipment.
- Use it in every call, message, and document related to that load — both you and the broker will refer to the load by this number.
- It must match the number printed on the Rate Confirmation exactly — accounting uses it to tie the invoice to the correct RC.
- Always copy it character-for-character from the broker's confirmation email or load tender. Even a single digit off can cause payment delays.
- To edit the load number, open the load detail and click the pencil icon next to the number in the top-left panel.
Load type
Every load is classified as one of two types, shown in small text just below the load number on the Load Board. The type determines how the load was created and where its defaults come from.
One Time
A standalone, spot-market shipment with no recurring contract. All fields — rate, broker, pickup, destination — are negotiated and entered fresh for each load. Use One Time for any shipment that isn't part of a fixed, contracted schedule.
Lane
A recurring run tied to a saved lane in Dispatch → Lanes. When a lane load is created, the broker, base rate, and route pre-fill automatically from the lane definition — reducing manual entry and the chance of error. Use Lane for contracted runs you operate on a regular schedule with the same broker and route.
Documents — RC, BOL, POD, Invoice
The Documents tab (the first tab in the load detail) shows four primary document slots and a More Documents table for any additional files. Each slot shows a thumbnail when a file is uploaded, or No document when empty.
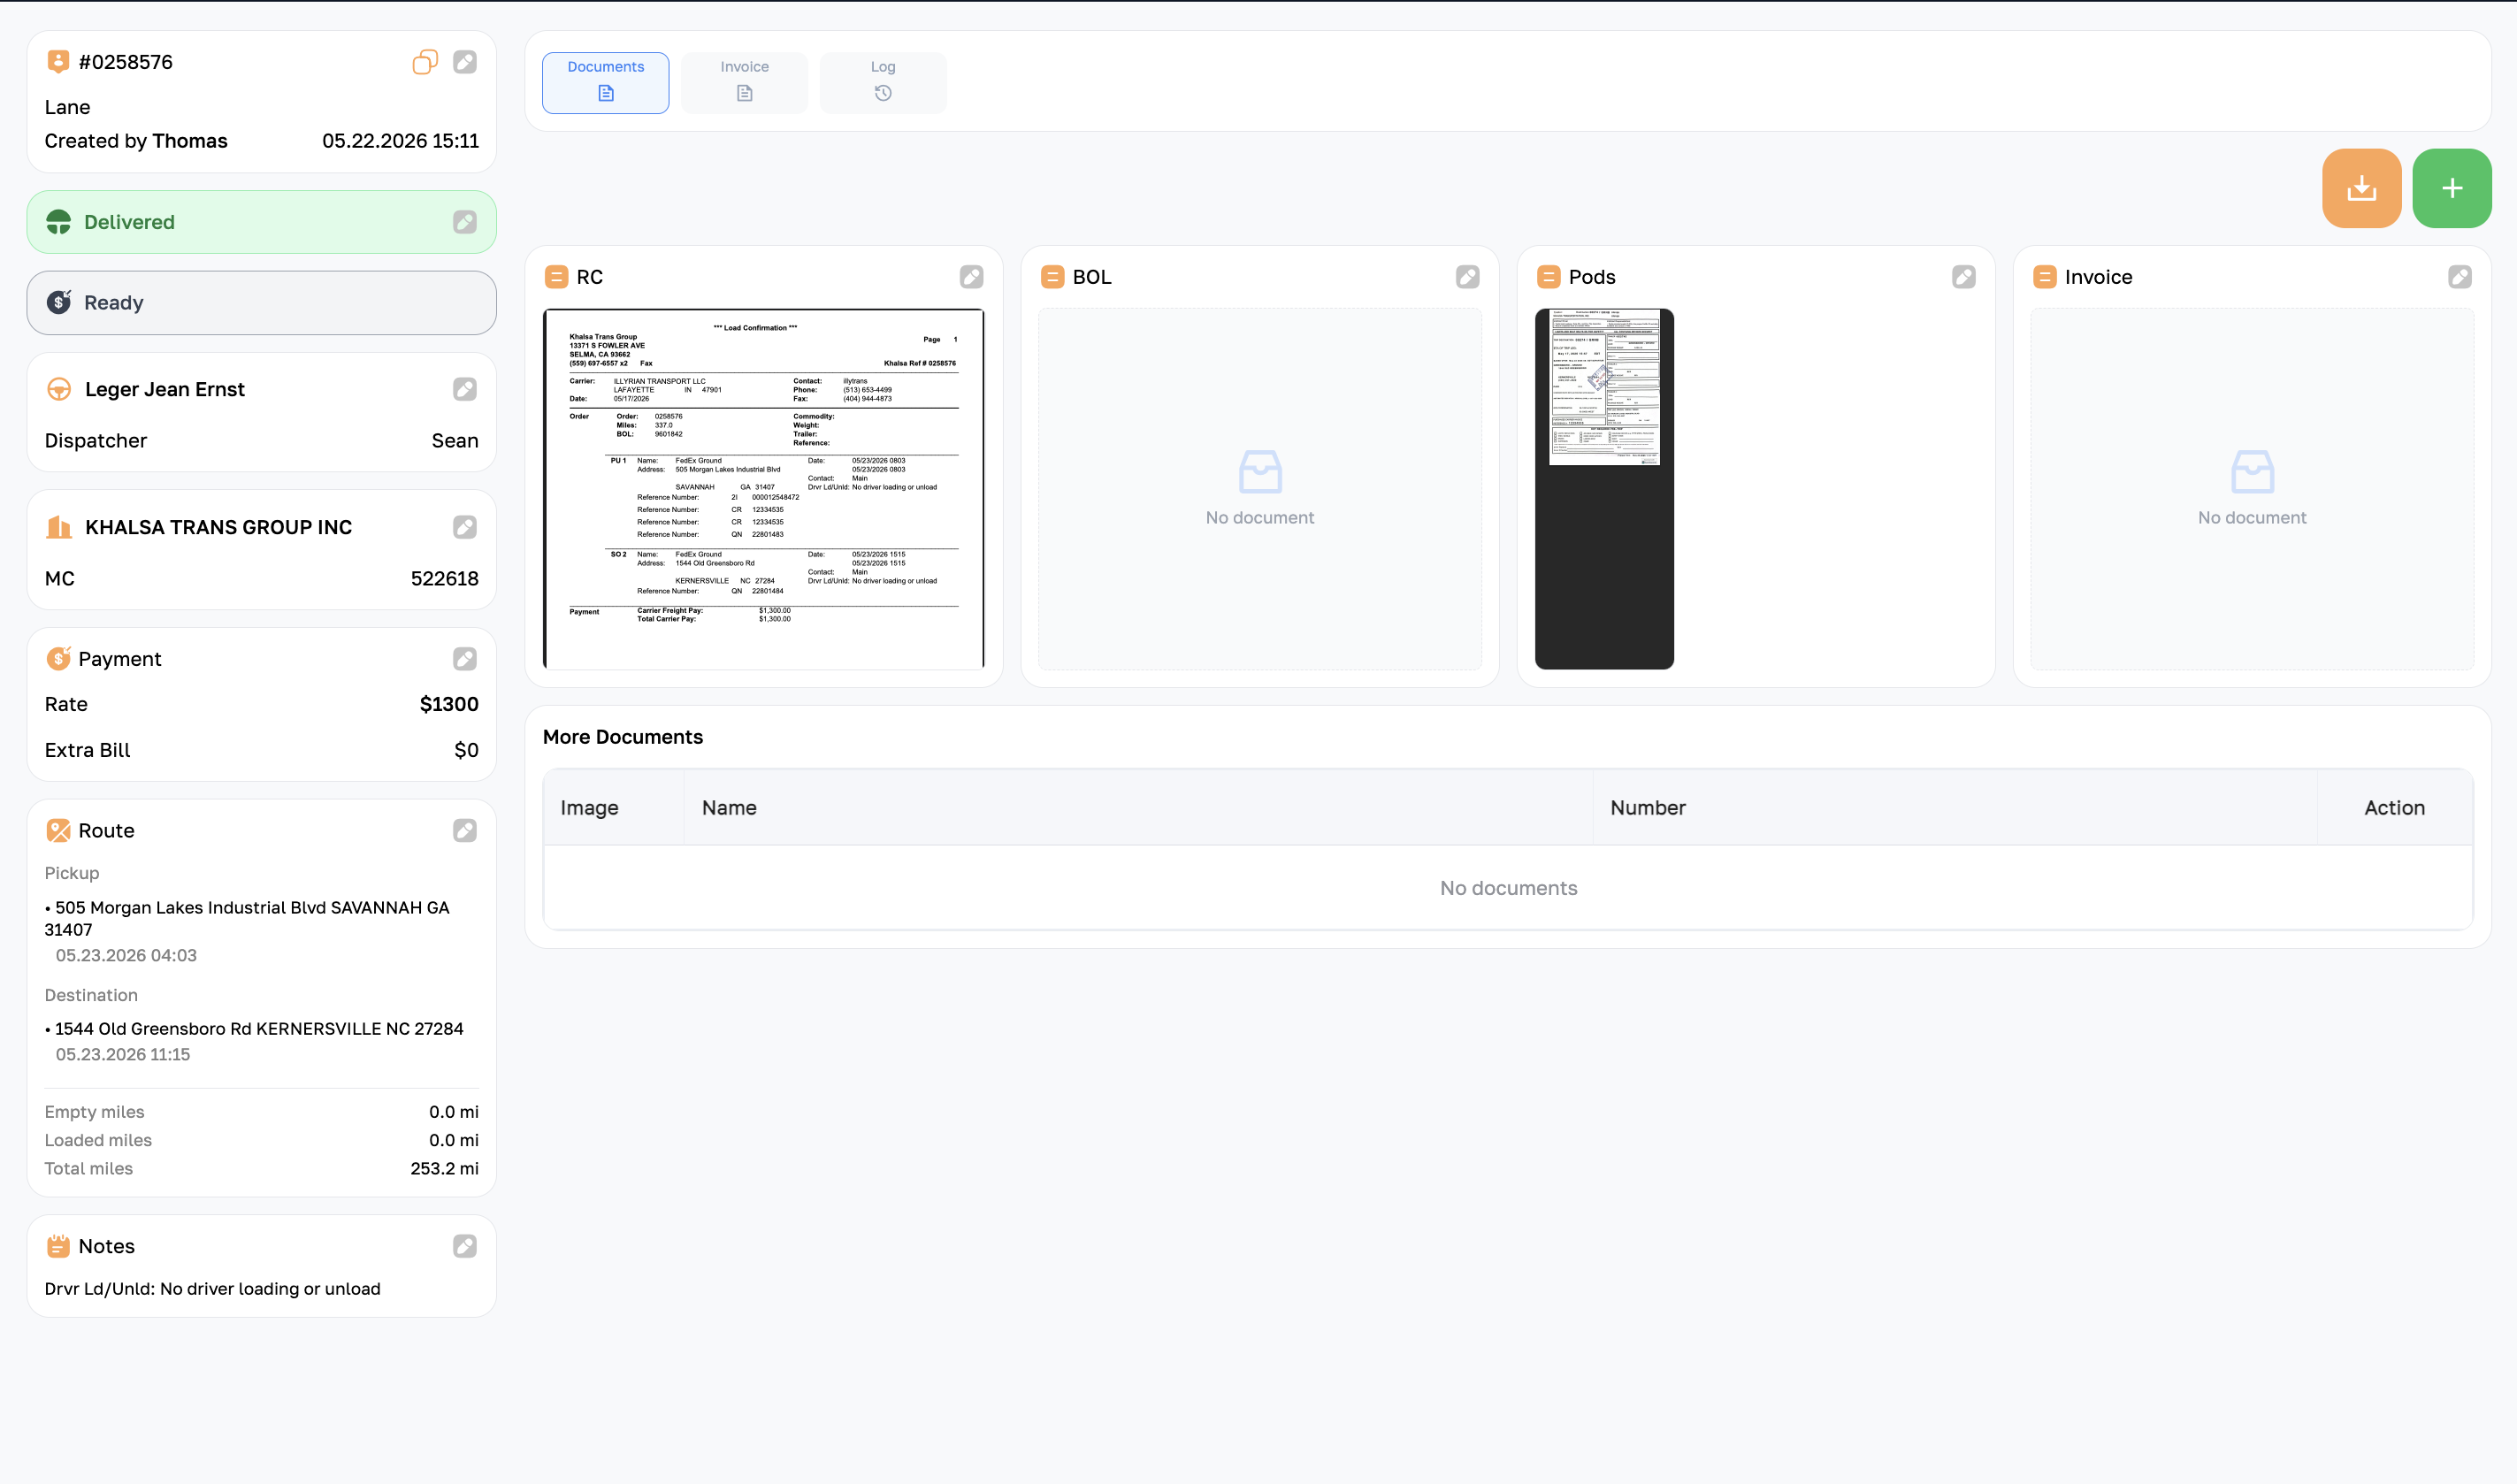
RC — Rate Confirmation
The legal contract between your carrier and the broker. It states the agreed-upon rate, pickup and delivery addresses, commodity, weight, and any special requirements (temperature control, team driver, hazmat). The broker sends the RC before the load moves. Verify every figure matches what was verbally agreed before the driver departs — the RC is the document accounting invoices against. If anything is wrong, call the broker to correct it before signing.
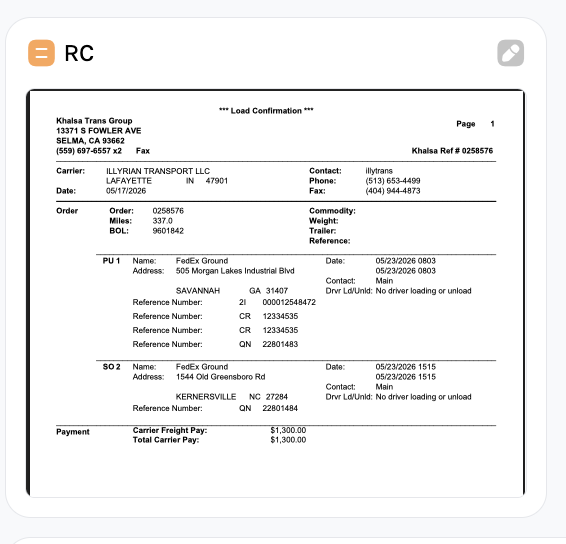
BOL — Bill of Lading
The shipping receipt issued by the shipper at the origin facility. It lists the freight description, piece count, weight, and the condition of the cargo at the time of loading. The driver must get the BOL signed and stamped by the shipper before leaving the dock. A signed BOL is the carrier's proof that the freight was received in good condition — it is the primary defence if a cargo damage claim is filed later.
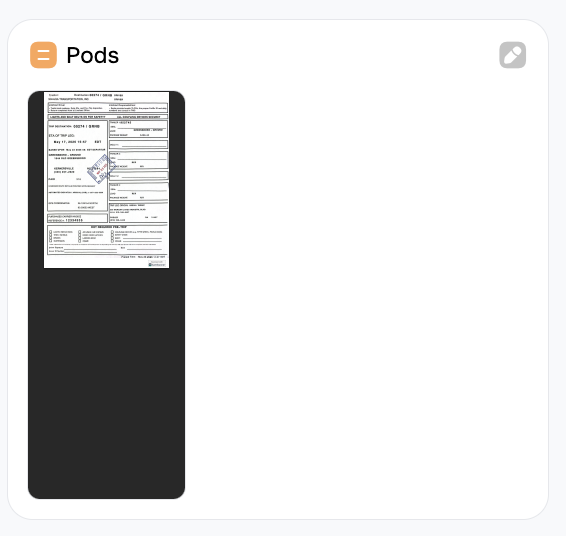
POD — Proof of Delivery
The signed delivery receipt from the consignee at the destination. When the driver delivers, the consignee signs and stamps the BOL — that signed copy becomes the POD. Upload it to the load as soon as the driver sends a photo. No POD = no invoice. Most brokers will not release payment without it. The Docs Board flags any Delivered load missing a POD.
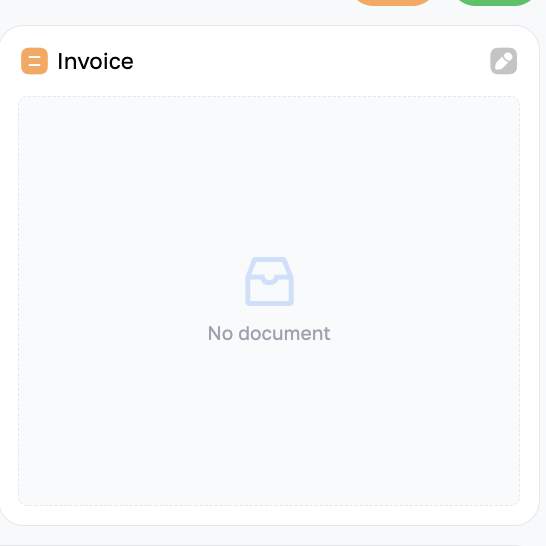
Invoice
The invoice sent to the broker or factoring company after a successful delivery. Accounting generates it from the load's Rate and Extra Bill totals and attaches the RC, BOL, and POD as supporting documents. Once the invoice has been sent, upload a copy here so the load file is complete.
Route & miles
The Route section on the left panel of the load detail shows the full itinerary and the three mileage figures used to assess profitability. Click the pencil icon in the Route header to edit any of these fields.
Pickup
The origin — where the driver collects the freight. Displays the facility name, full street address, city, state, and ZIP, plus the scheduled pickup appointment date and time. Confirm this matches the RC before dispatching the driver.
Destination
The delivery point — where the freight is dropped off. Displays the consignee facility name, full address, and the delivery appointment window. A load can have multiple destinations (multi-stop drops); each stop appears in sequence under the Route section.
Empty miles (deadhead)
Miles driven with no freight on board — from the driver's last position to the pickup facility. Deadhead miles burn fuel and add wear but generate zero revenue. A high empty-mile count relative to loaded miles is a profitability warning and usually signals poor truck positioning or a badly matched load.
Loaded miles
Miles driven while carrying the freight — from the pickup facility to the final destination. These are the revenue-generating miles. Rate per loaded mile (RPM) is the key efficiency metric shown on the Gross Board.
Total miles
Empty miles + Loaded miles. The full distance the truck travels for this load. Used for fuel cost estimation and for driver pay when the driver is compensated per mile (rather than a percentage of the gross).
Actions
Every editable field in the load detail shows a pencil icon (✏️) on hover. Clicking it opens a right-hand drawer with the relevant form. All changes are saved with the Save button at the bottom of the drawer and are timestamped in the Log tab of the load.
Change load status
Click the coloured status chip in the top-left panel (e.g. En Route). A status picker slides in from the right showing all available statuses. Select the new status and confirm. Use this to advance the load lifecycle (Upcoming → En Route → Delivered) or to pause it (On Hold). See Load statuses for what each status means.
Change load number or type
Click the pencil icon next to the load number at the top of the detail page. In the drawer, update the Load number field (the broker's reference) and/or switch the Load type between One Time and Lane. Save.
Change driver
Click the pencil icon next to the driver's name. A driver-picker drawer opens — search by name or scroll the list. Select the replacement driver and save. The previous driver is automatically unassigned from this load.
Change broker
Click the pencil icon in the broker row (showing the broker name and MC number). Search for and select the correct broker from your Brokers directory. Save. The broker on a load determines which factoring company receives the invoice — double-check before invoicing.
Change rate
Click the pencil icon in the Payment section next to the Rate field. Enter the new agreed rate in dollars and save. The updated rate flows immediately to the Gross Board and Invoicing Board.
Change extra bill
In the same Payment drawer as Rate, update the Extra Bill field.
Extra Bill covers any charge on top of the base rate — detention, layover, TONU
(Truck Order Not Used), lumper reimbursement, or a fuel surcharge. It is added to
the Rate when the invoice total is calculated. Leave it at $0 if
there are no additional charges on this load.
Uploading documents
All documents are uploaded from the Documents tab of the load detail page. Click the pencil icon on any document card — a drawer slides in from the right with a drag-and-drop upload zone. Drop your file or click Browse to pick it from your computer, then hit Save (or Submit). Accepted formats: PDF, JPG, PNG. Max 20 MB per file. To replace an existing file, open the same drawer and upload again.
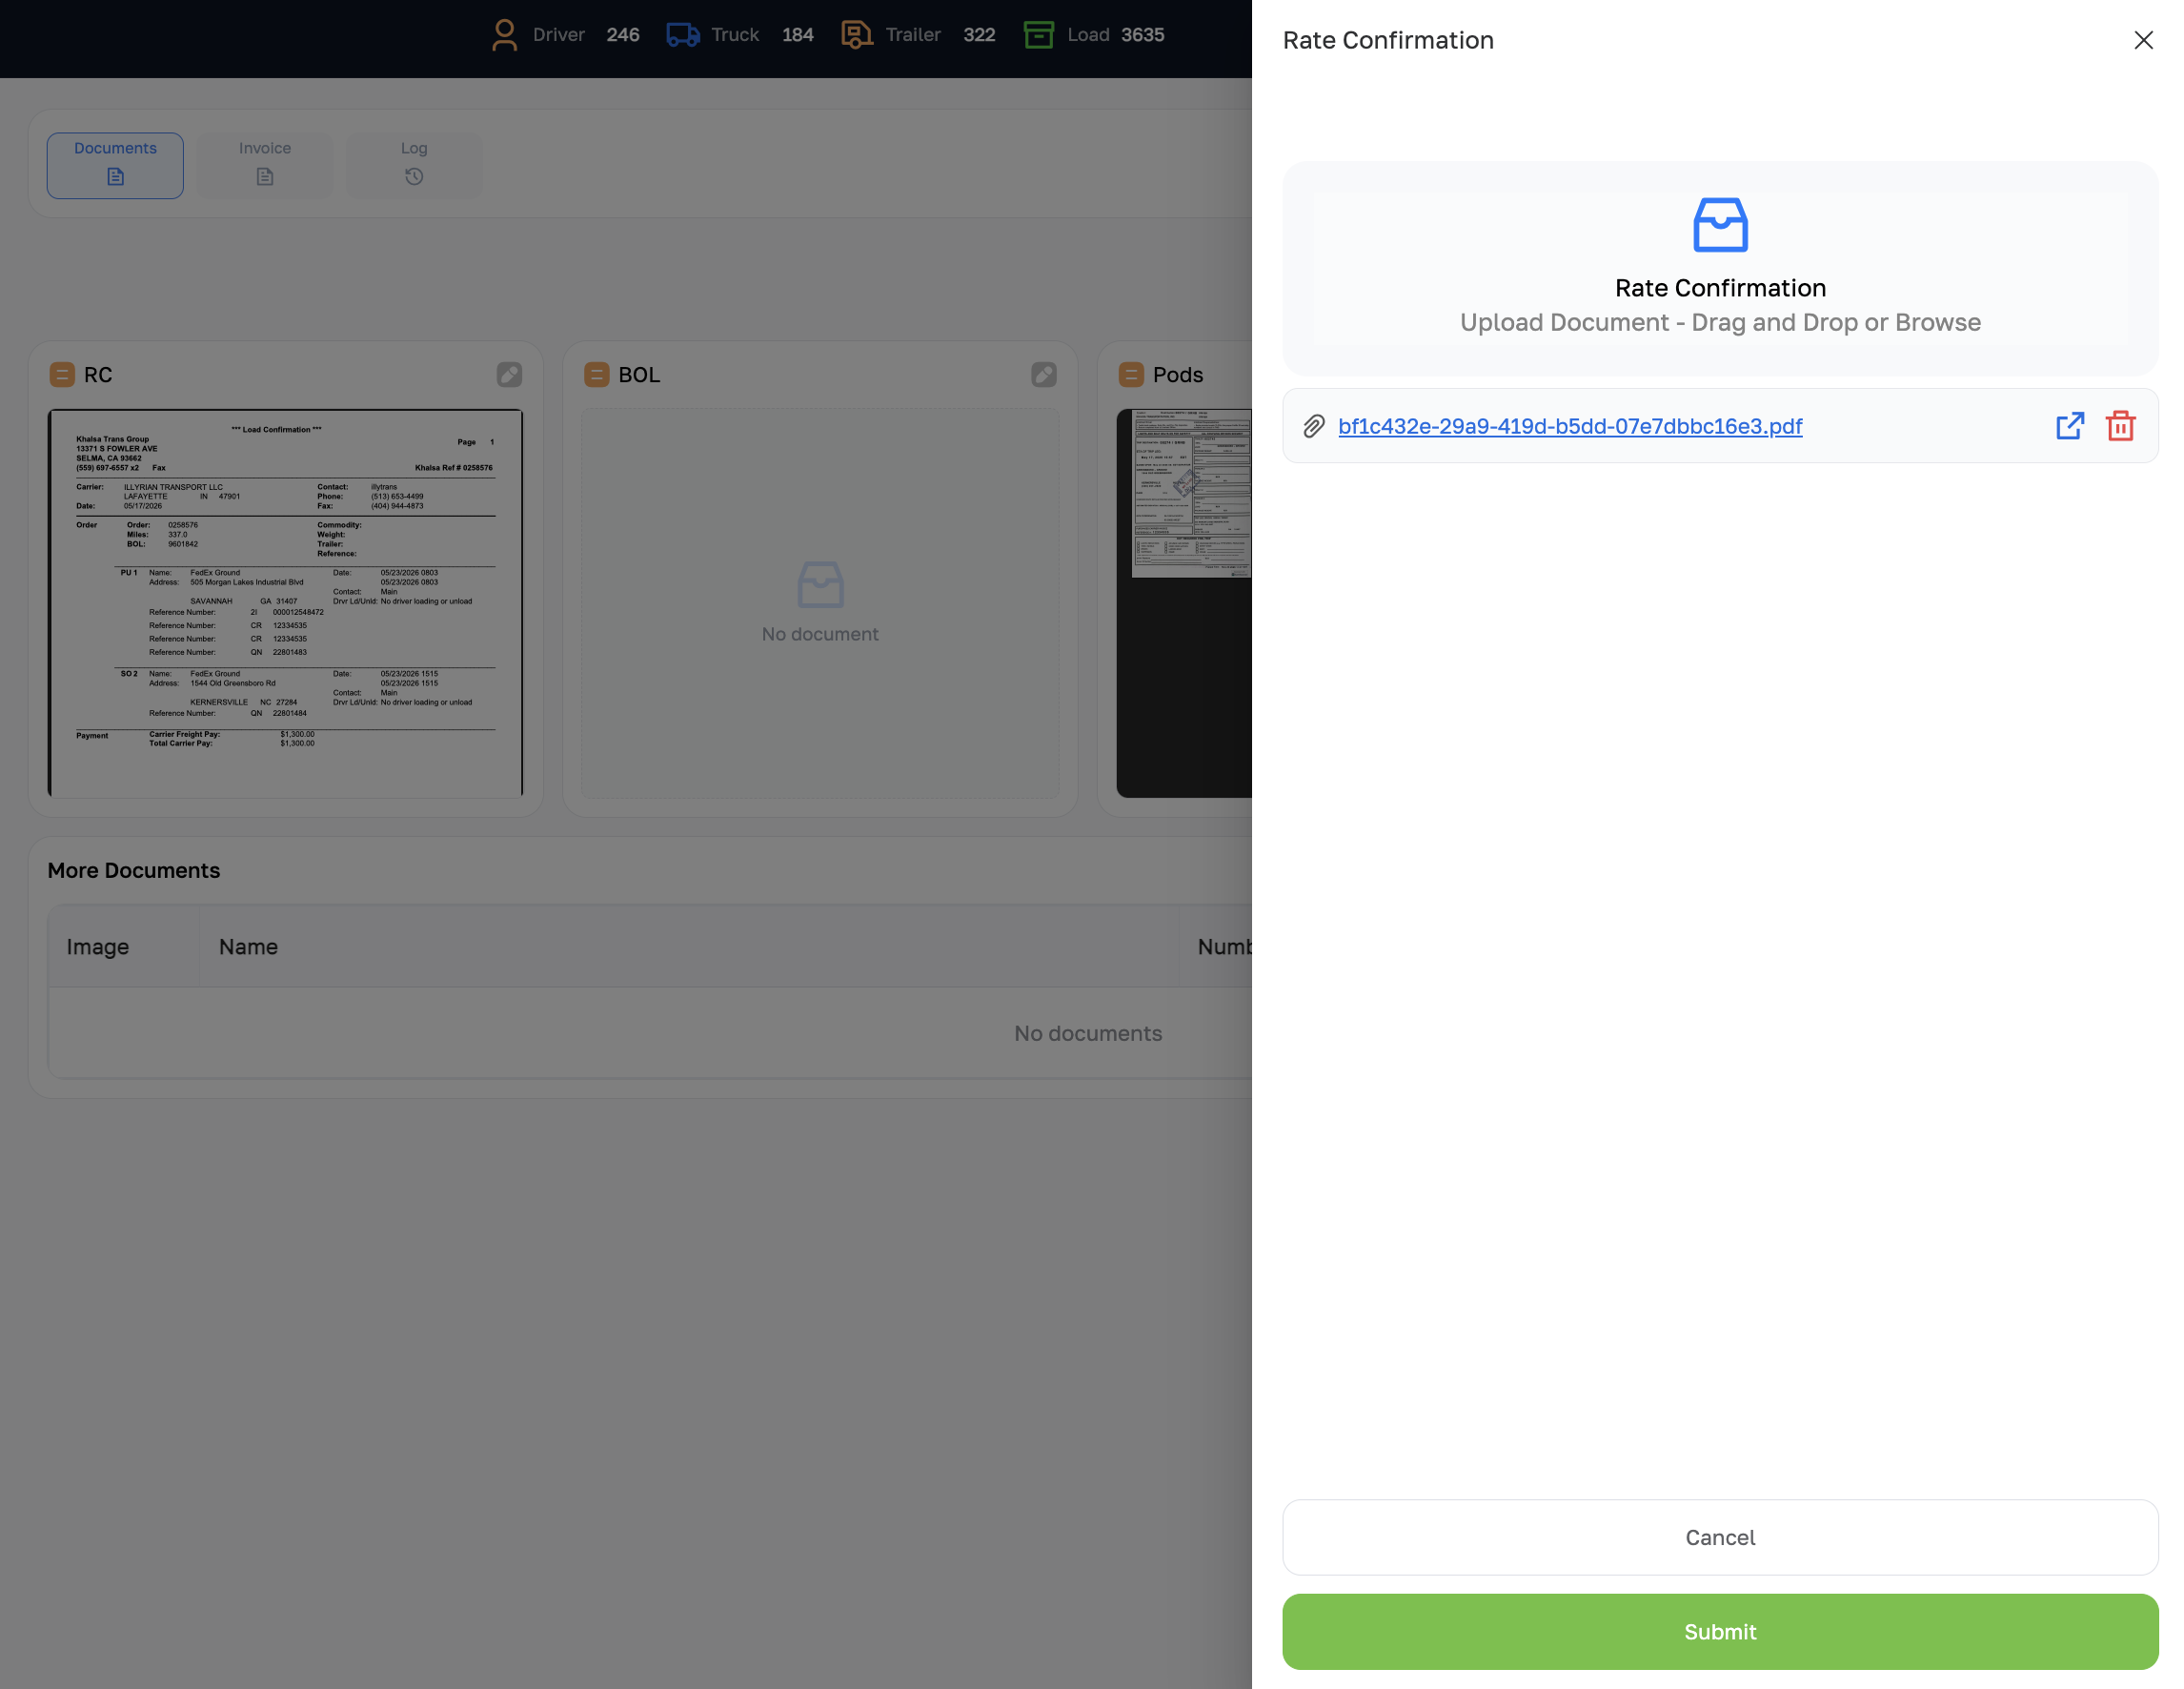
Upload RC — Rate Confirmation
Click the pencil icon on the RC card. The Rate Confirmation drawer opens. Drag and drop the PDF from the broker, or click to browse. If a file is already attached it shows as a link — you can open it in a new tab or delete it with the trash icon before uploading a replacement. Click Submit.
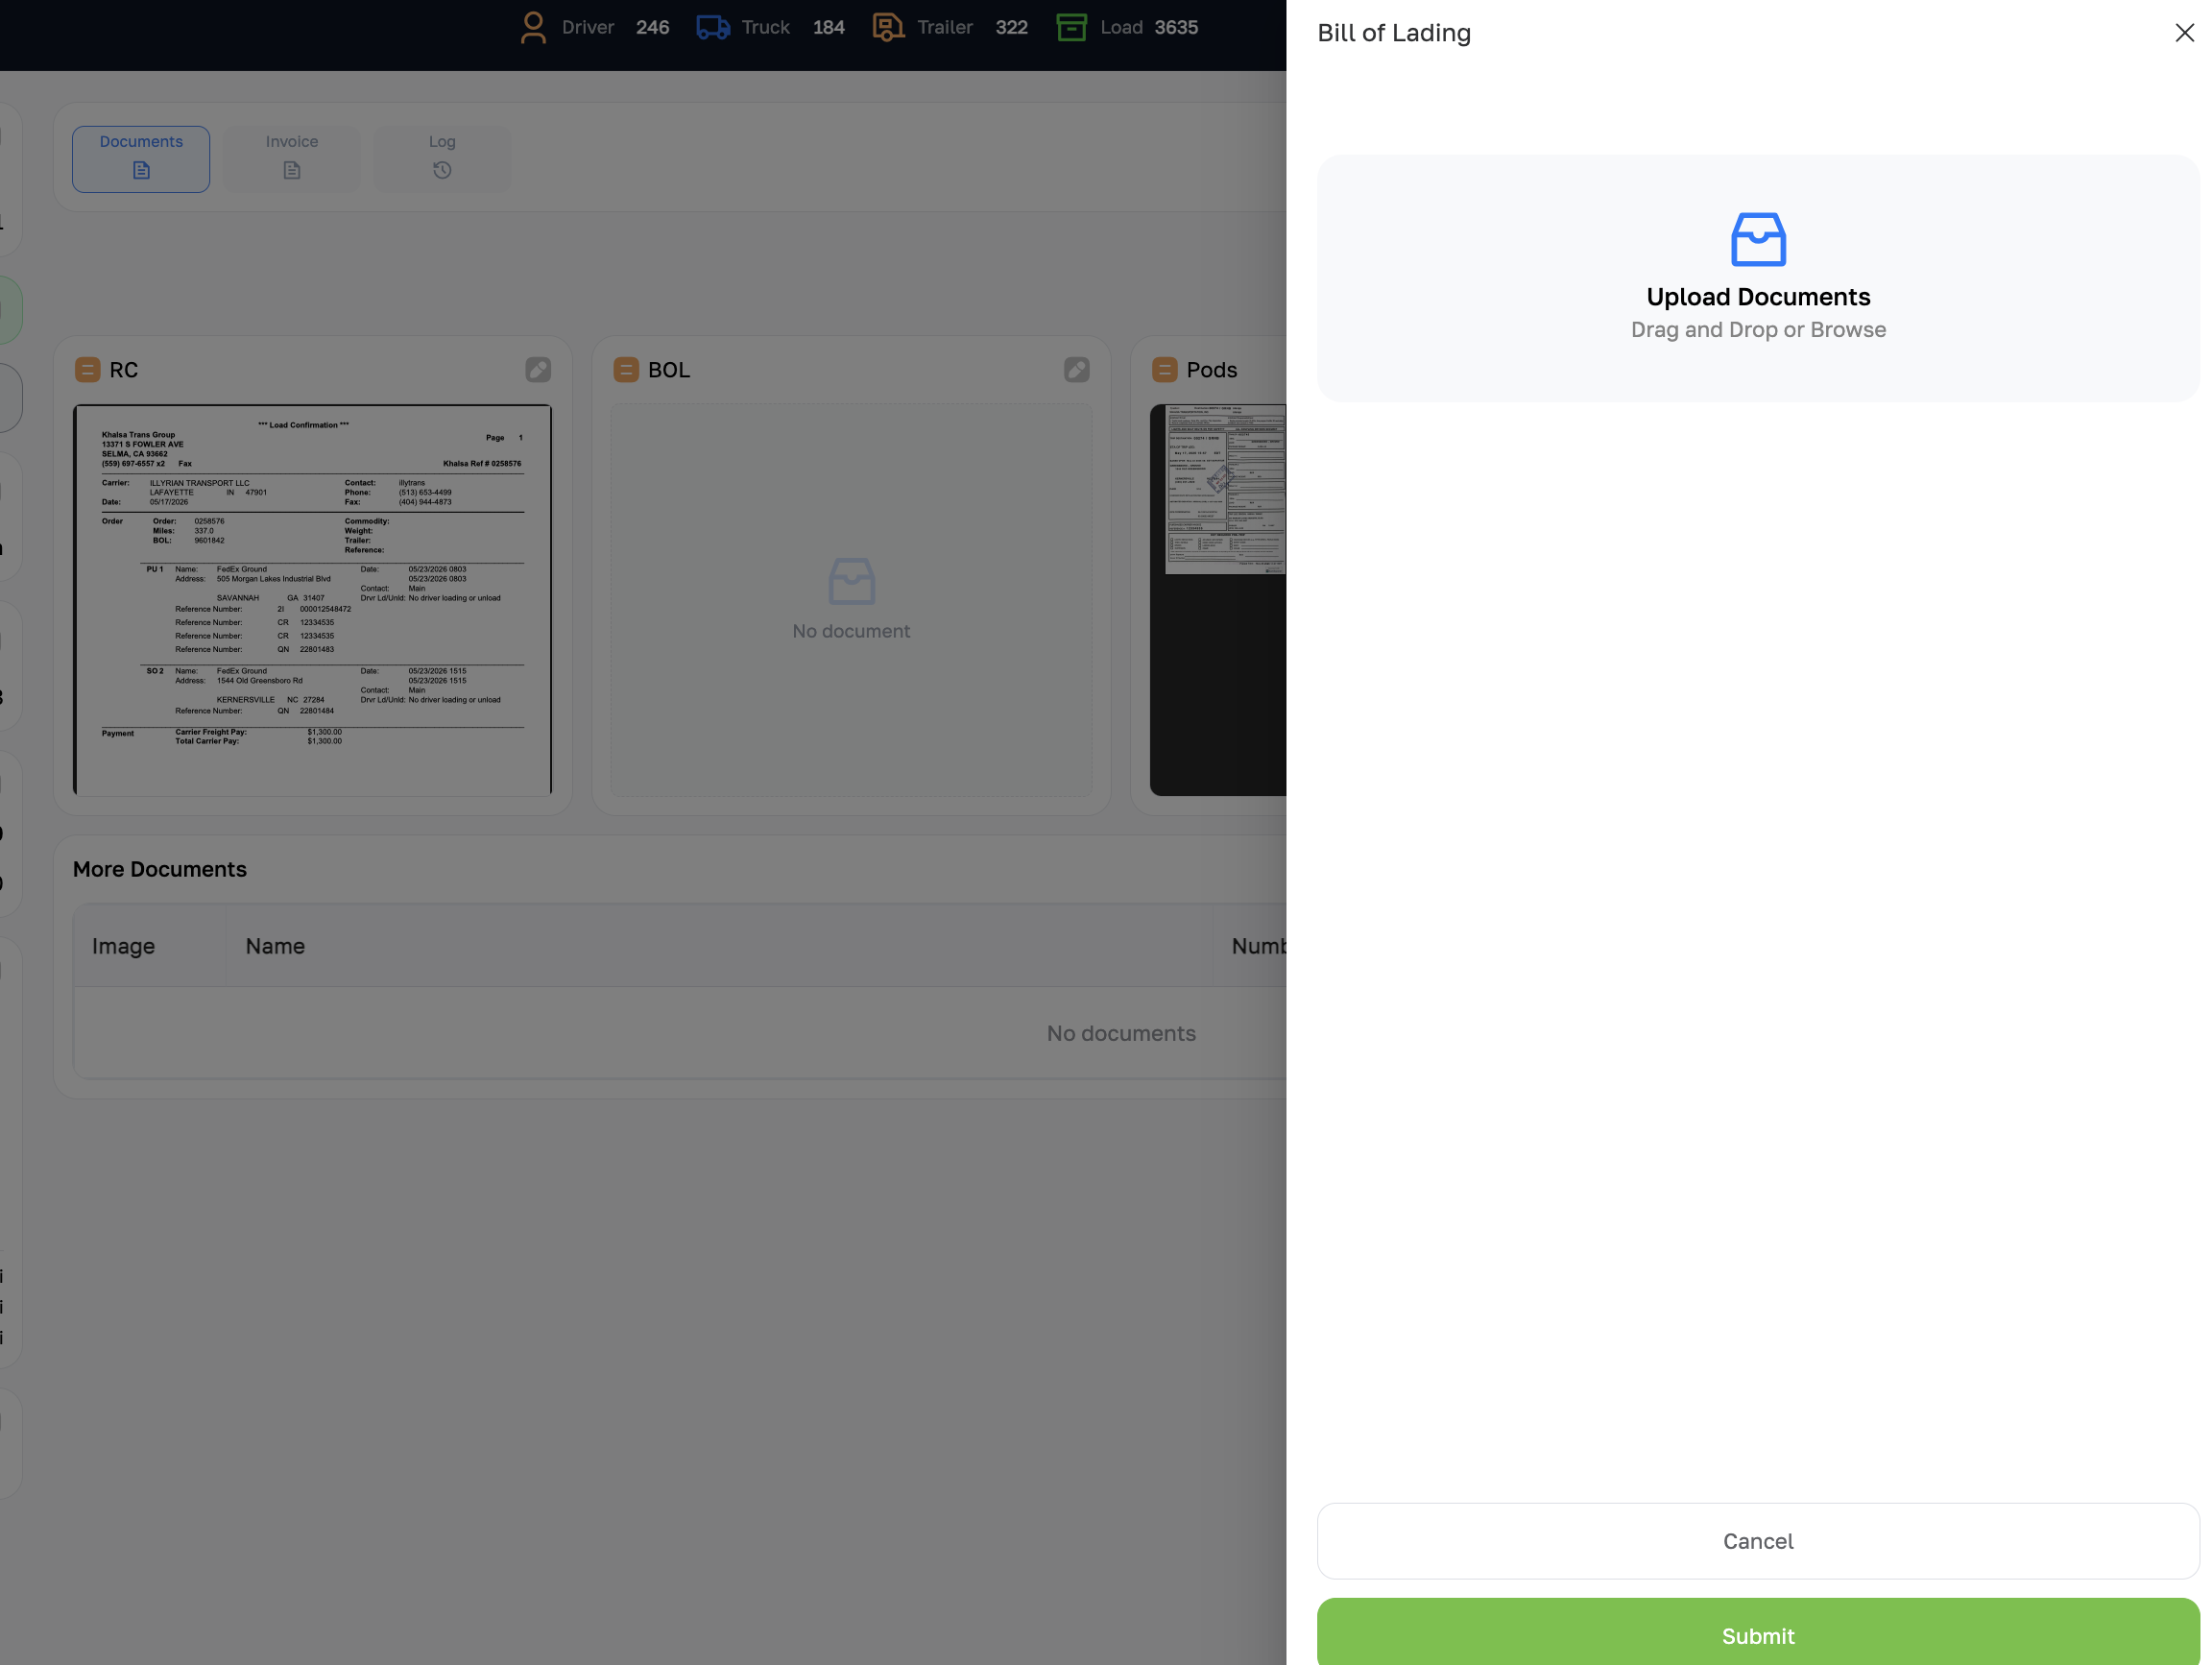
Upload BOL — Bill of Lading
Click the pencil icon on the BOL card. The Bill of Lading drawer opens with an Upload Documents — Drag and Drop or Browse zone. Drop the driver's scanned BOL photo or PDF, then click Submit. Upload as soon as the driver confirms pickup so the record is never left empty.
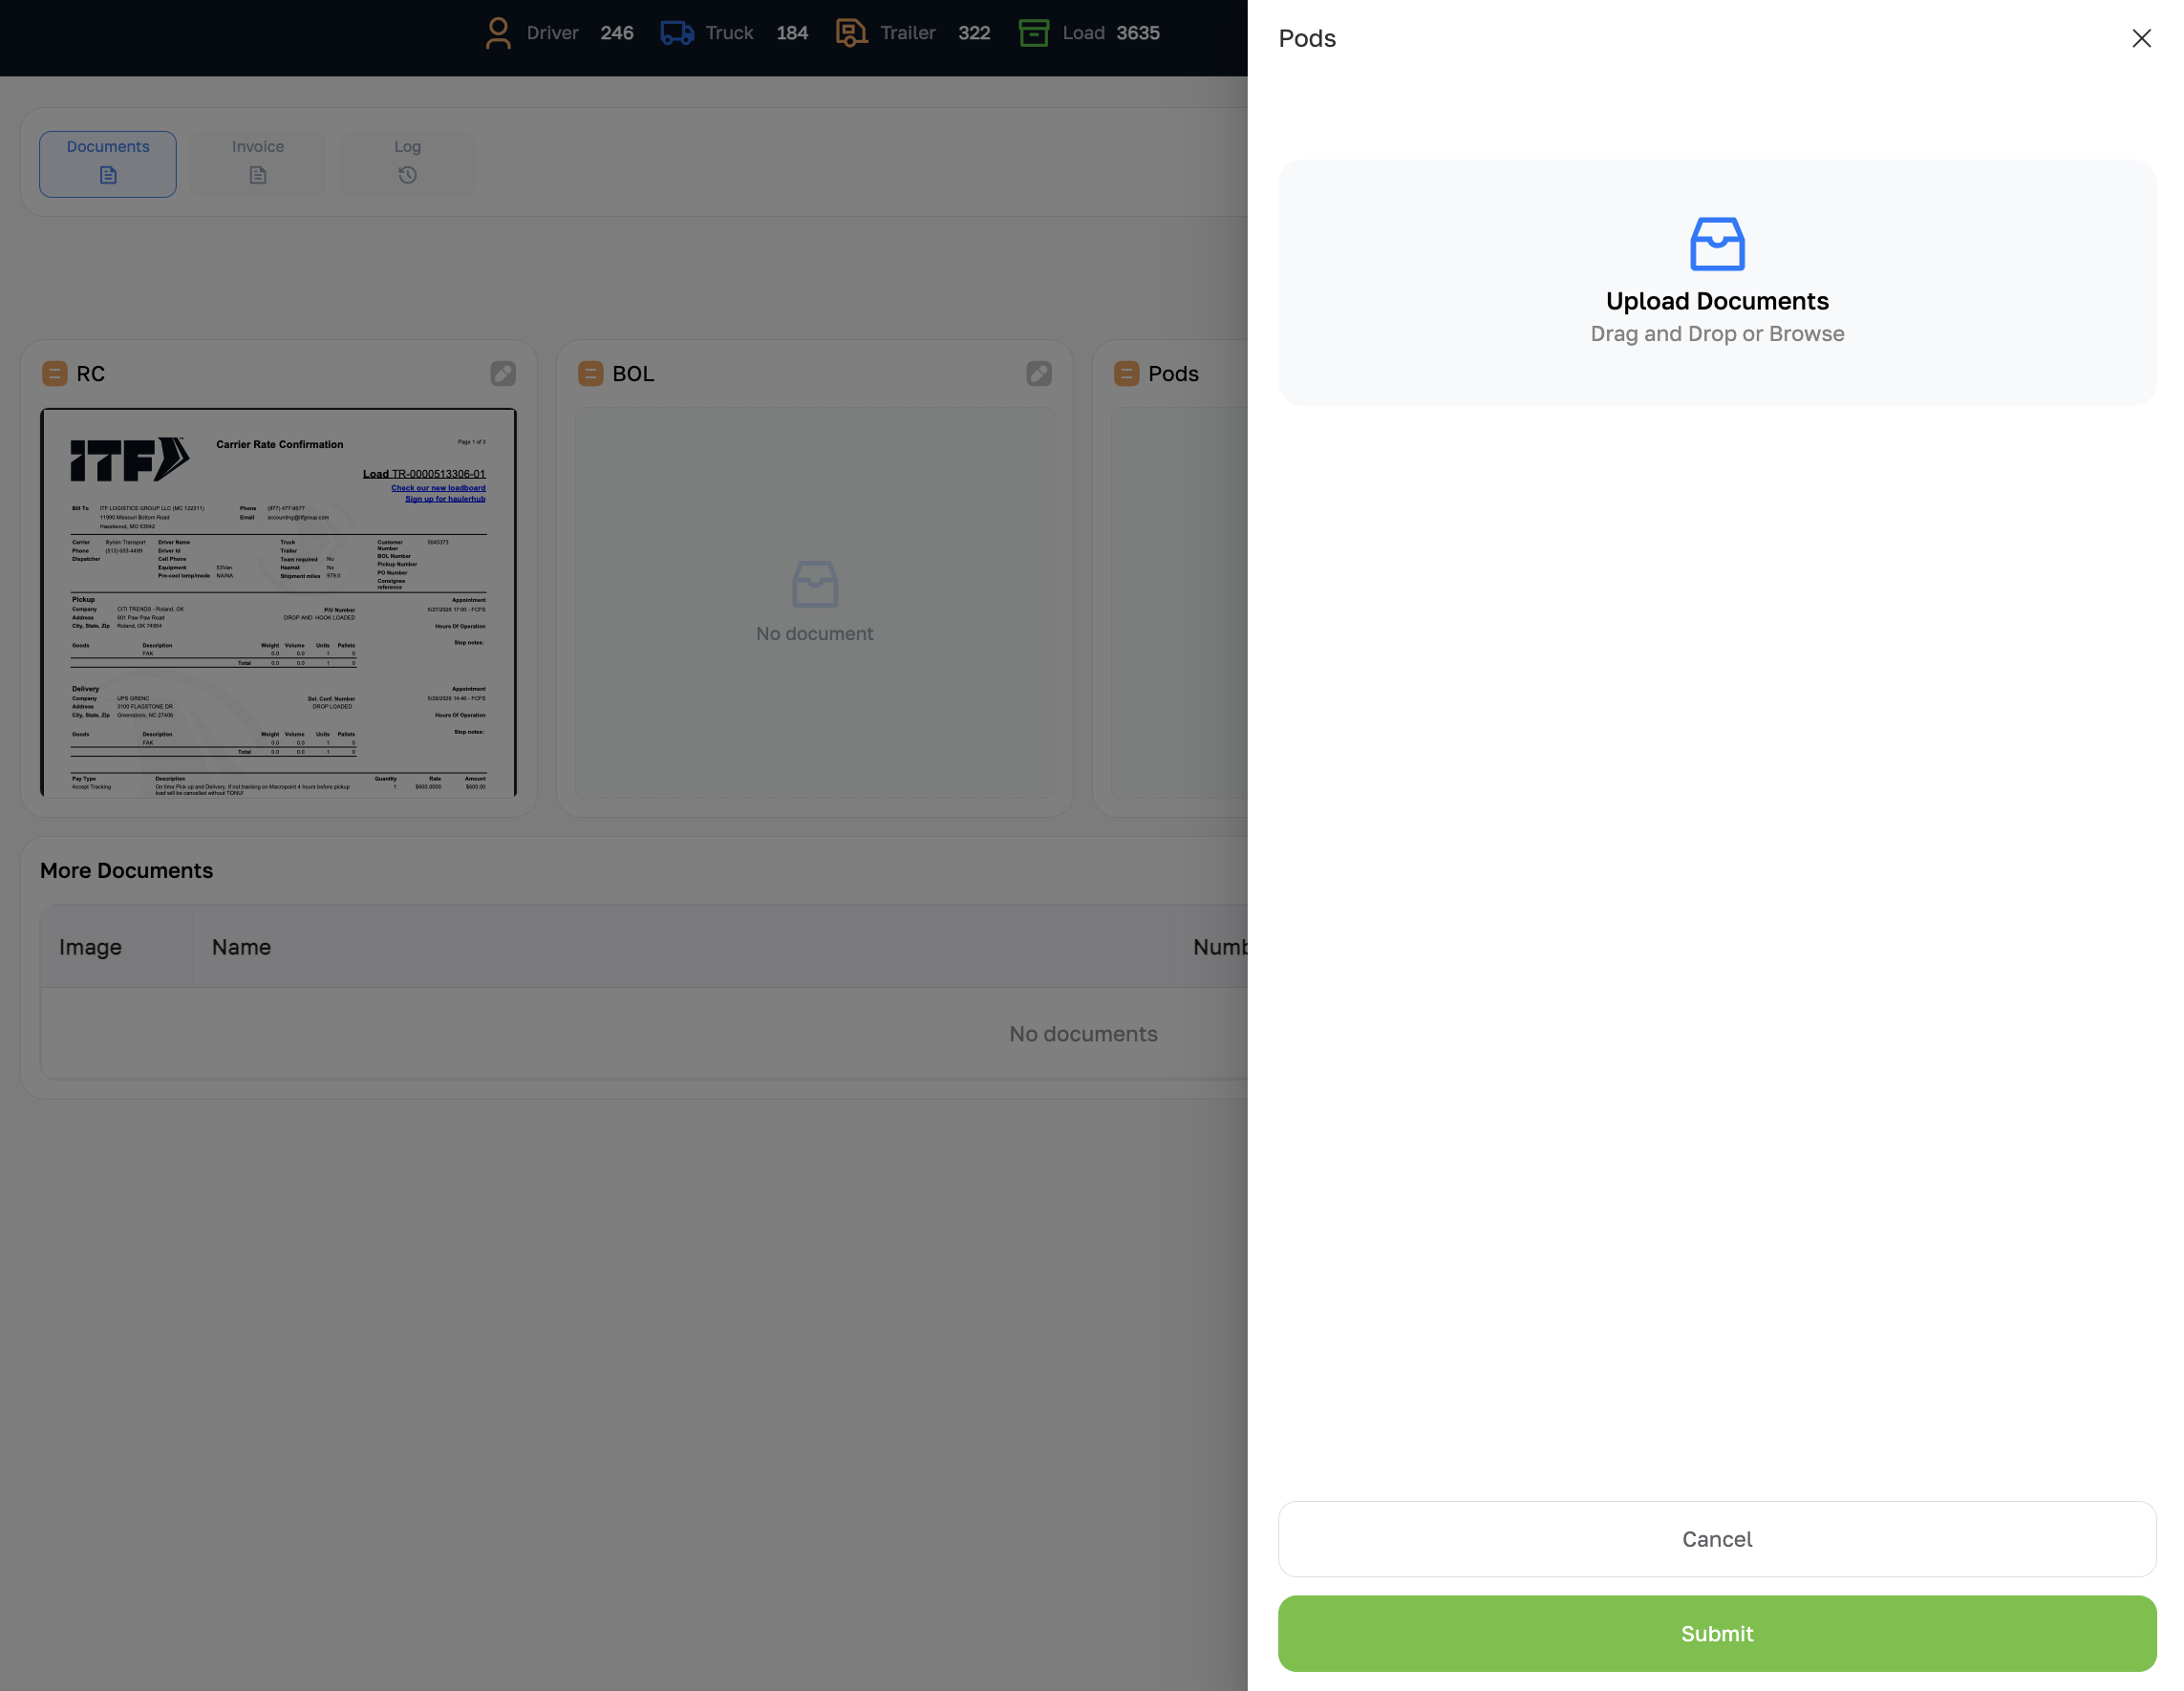
Upload POD — Proof of Delivery
Click the pencil icon on the Pods card. The Pods drawer opens. Drop the signed delivery receipt the driver sends after drop-off, then click Submit. The load cannot be invoiced without a POD on file — upload it the same day as delivery.
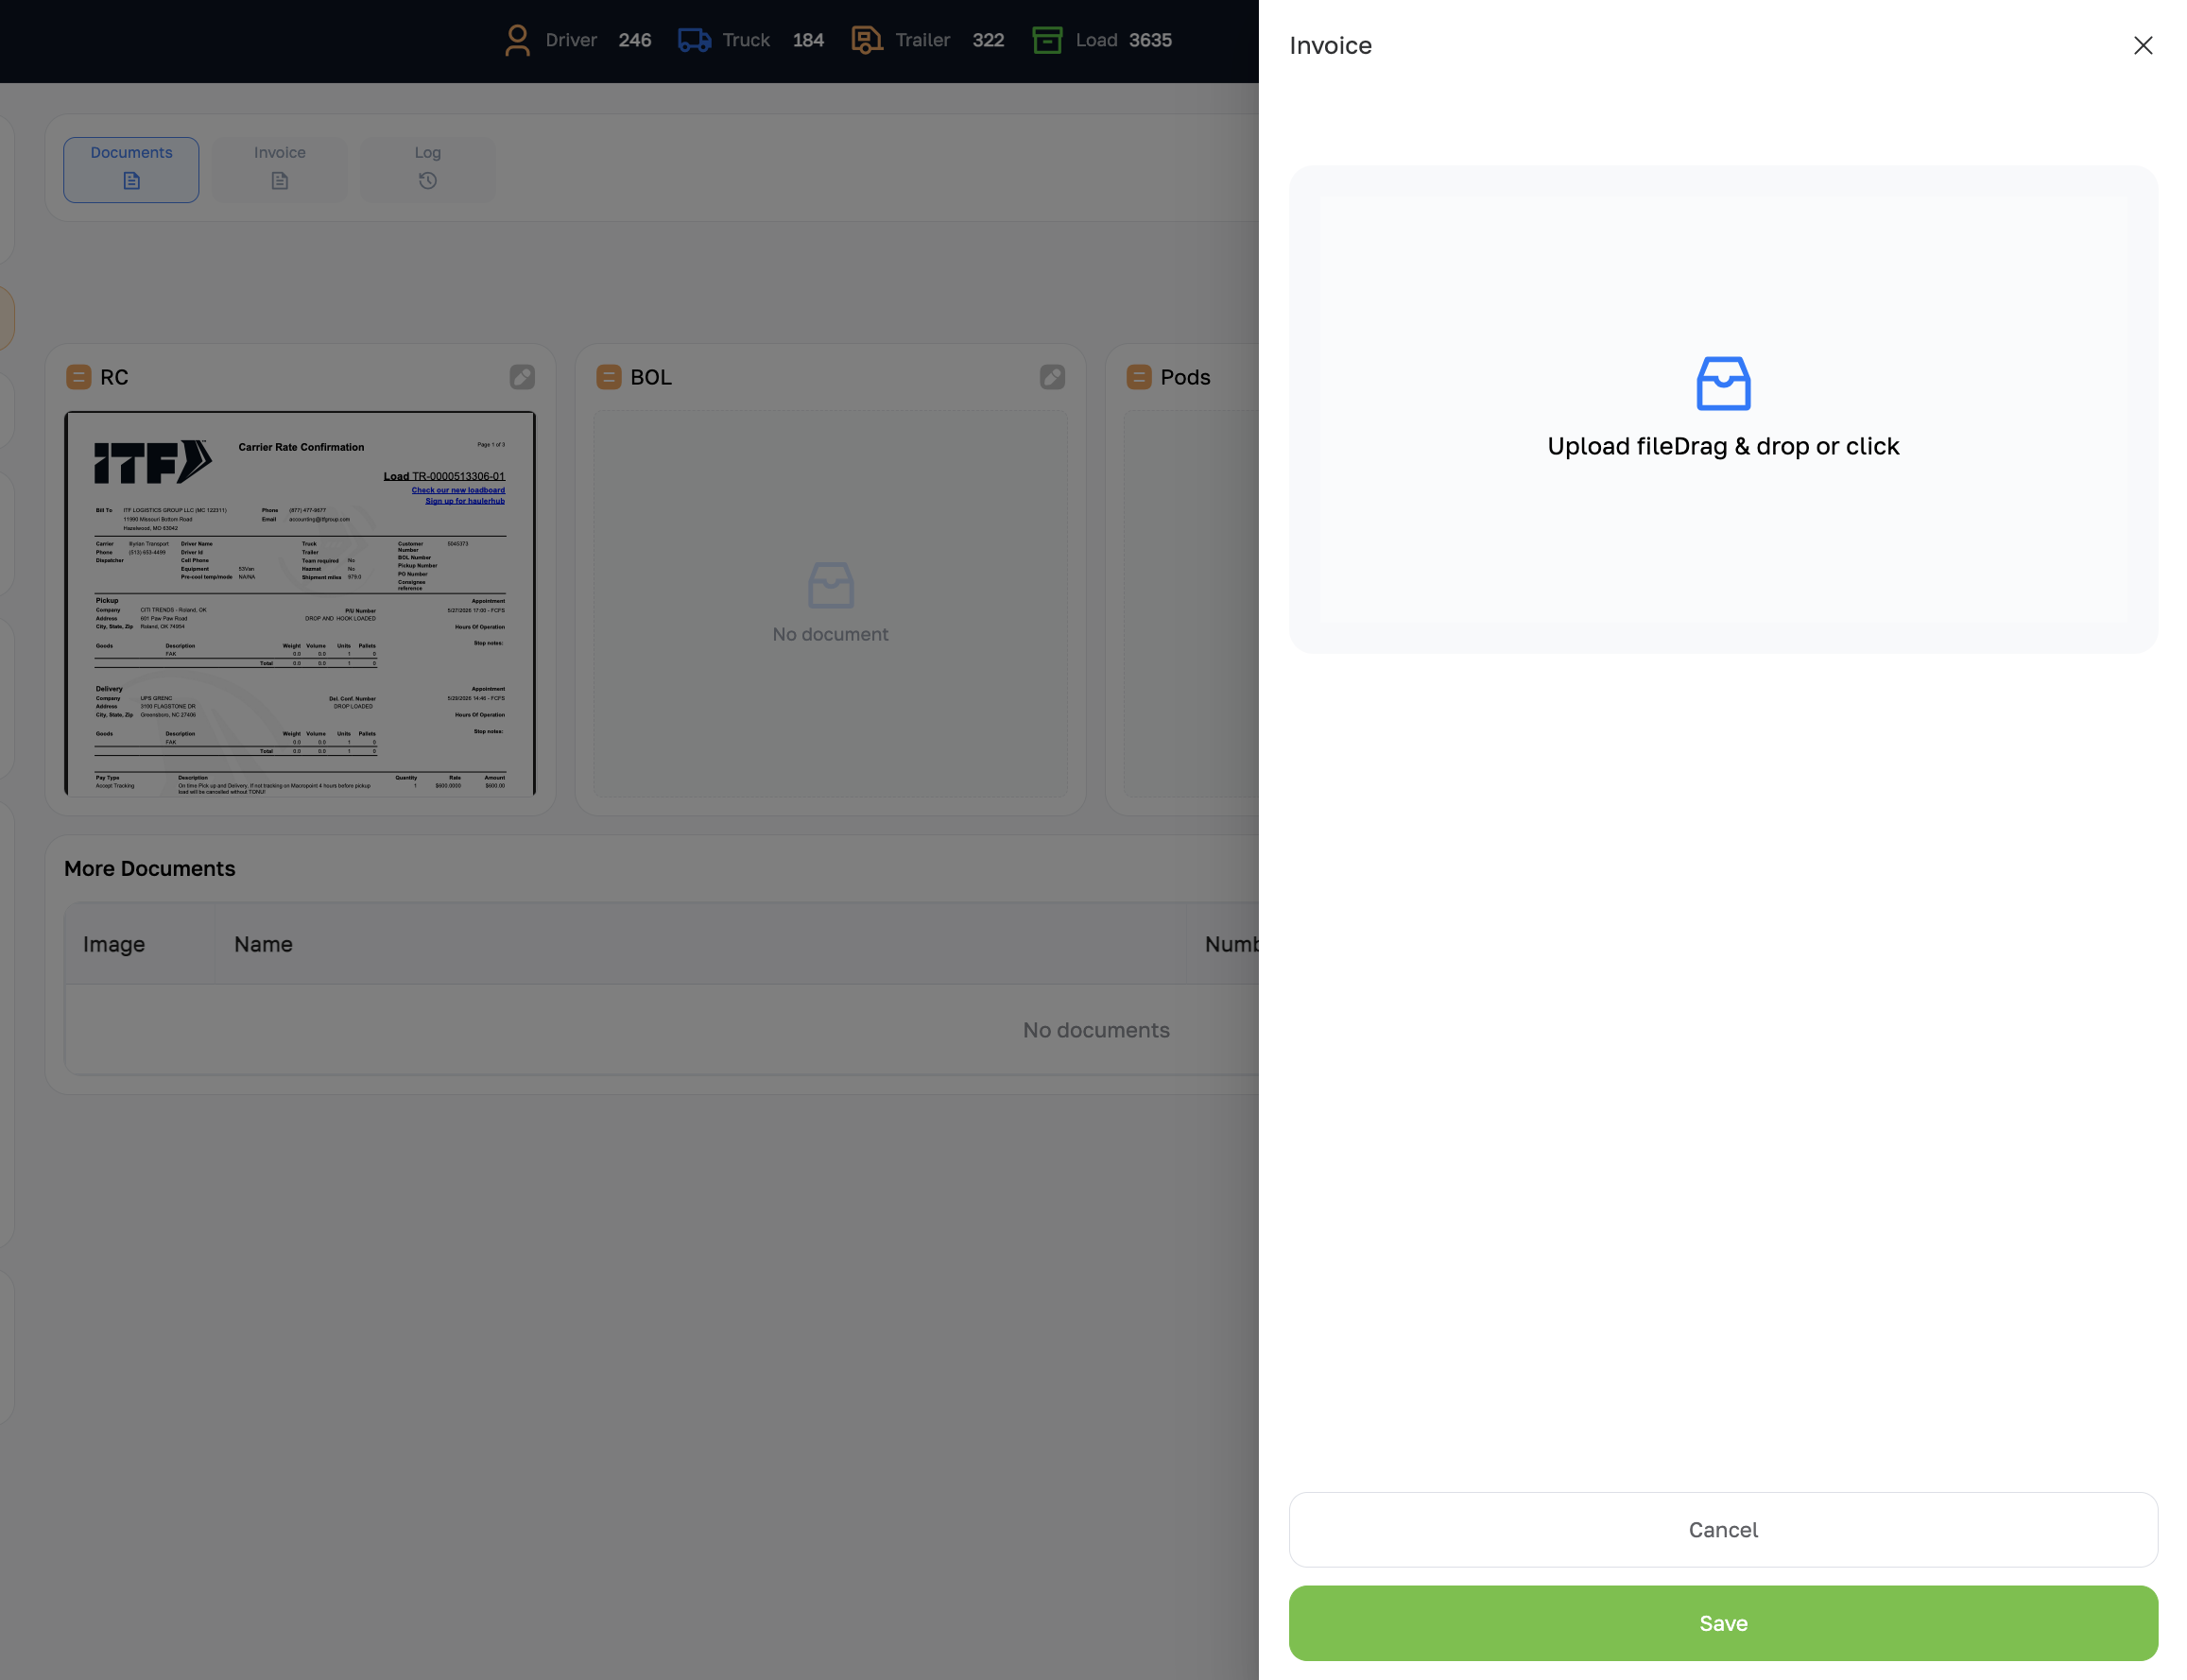
Upload Invoice
Click the pencil icon on the Invoice card. The Invoice drawer opens with an Upload file — Drag & drop or click zone. Attach the invoice PDF after accounting has sent it to the broker or factoring company, then click Save. This completes the document package for the load.
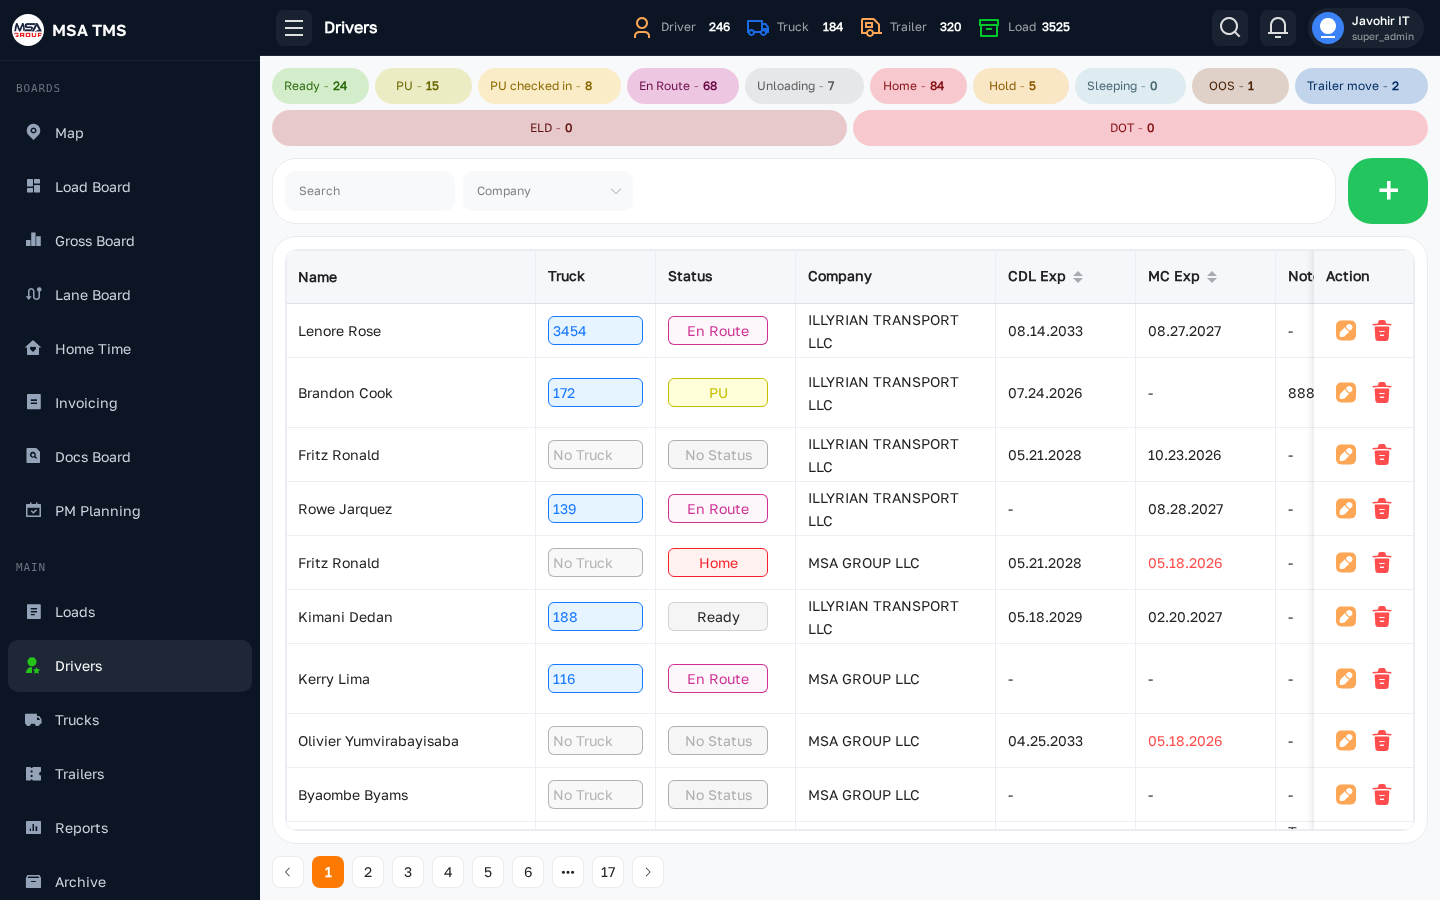
Drivers
The driver roster. For each driver you can open a profile page with personal info, CDL, medical, payroll (% per load or per mile), assigned truck, hours of service, contacts, and uploaded documents.
- + New driver — onboarding wizard for a brand-new driver.
- Filter by employment status (Active, Terminated, Onboarding).
- Open a driver to manage hold/release, vacation, and pay history.
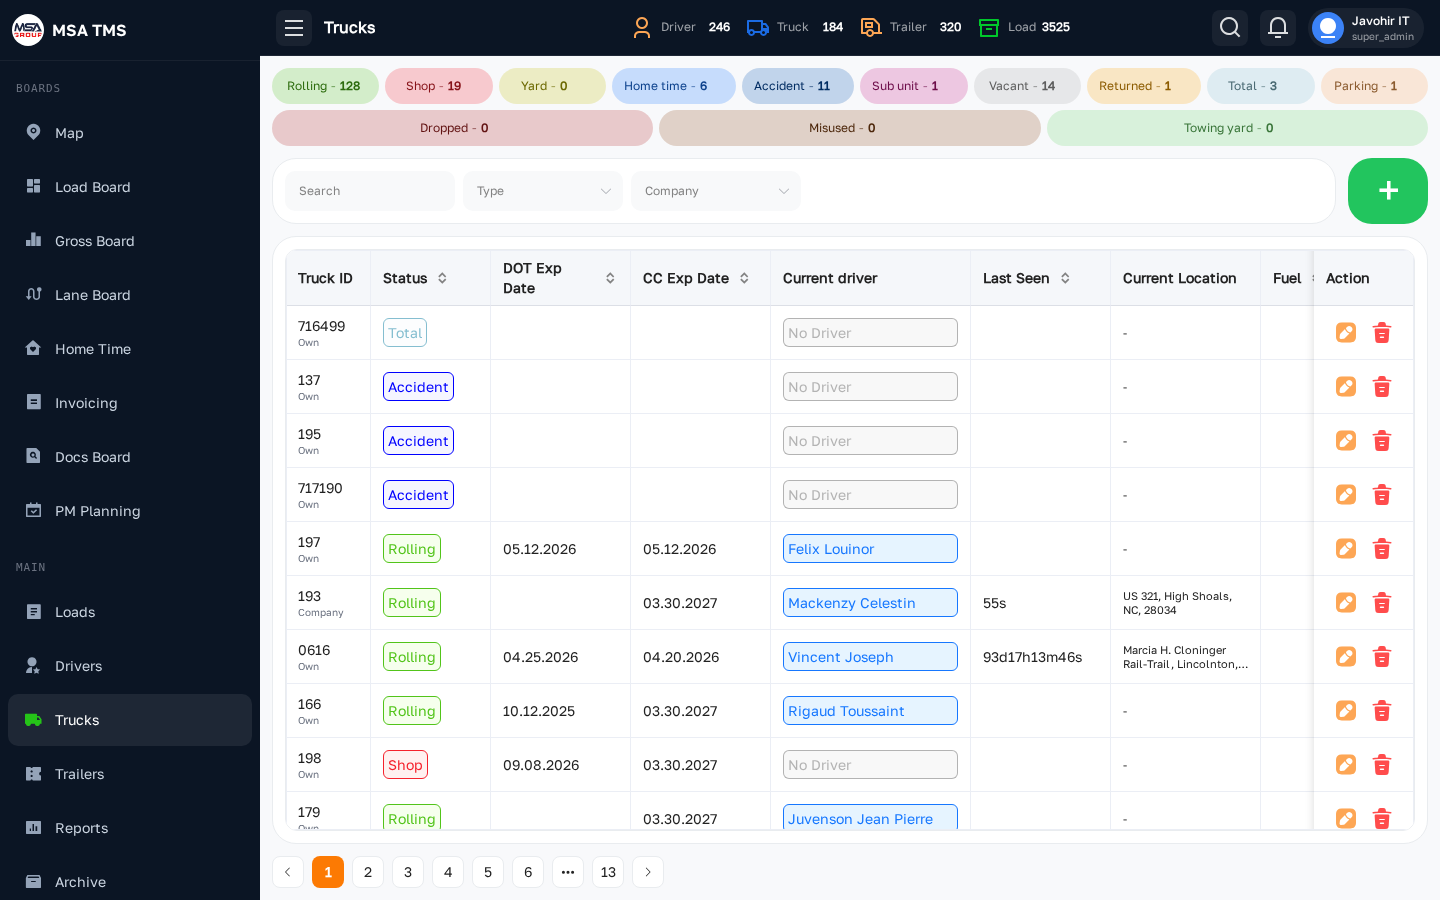
Trucks
Every power unit in the fleet. A truck record holds VIN, plate, make and model, annual registration, ownership (owned / leased / O/O), assigned driver, and any attached devices (Samsara, Azuga, etc.).
From a truck record you can:
- Assign or unassign a driver.
- Open the truck's PM schedule, repair history, fuel-card transactions.
- Add documents (registration, IFTA, annual inspection, plates).
Trailers
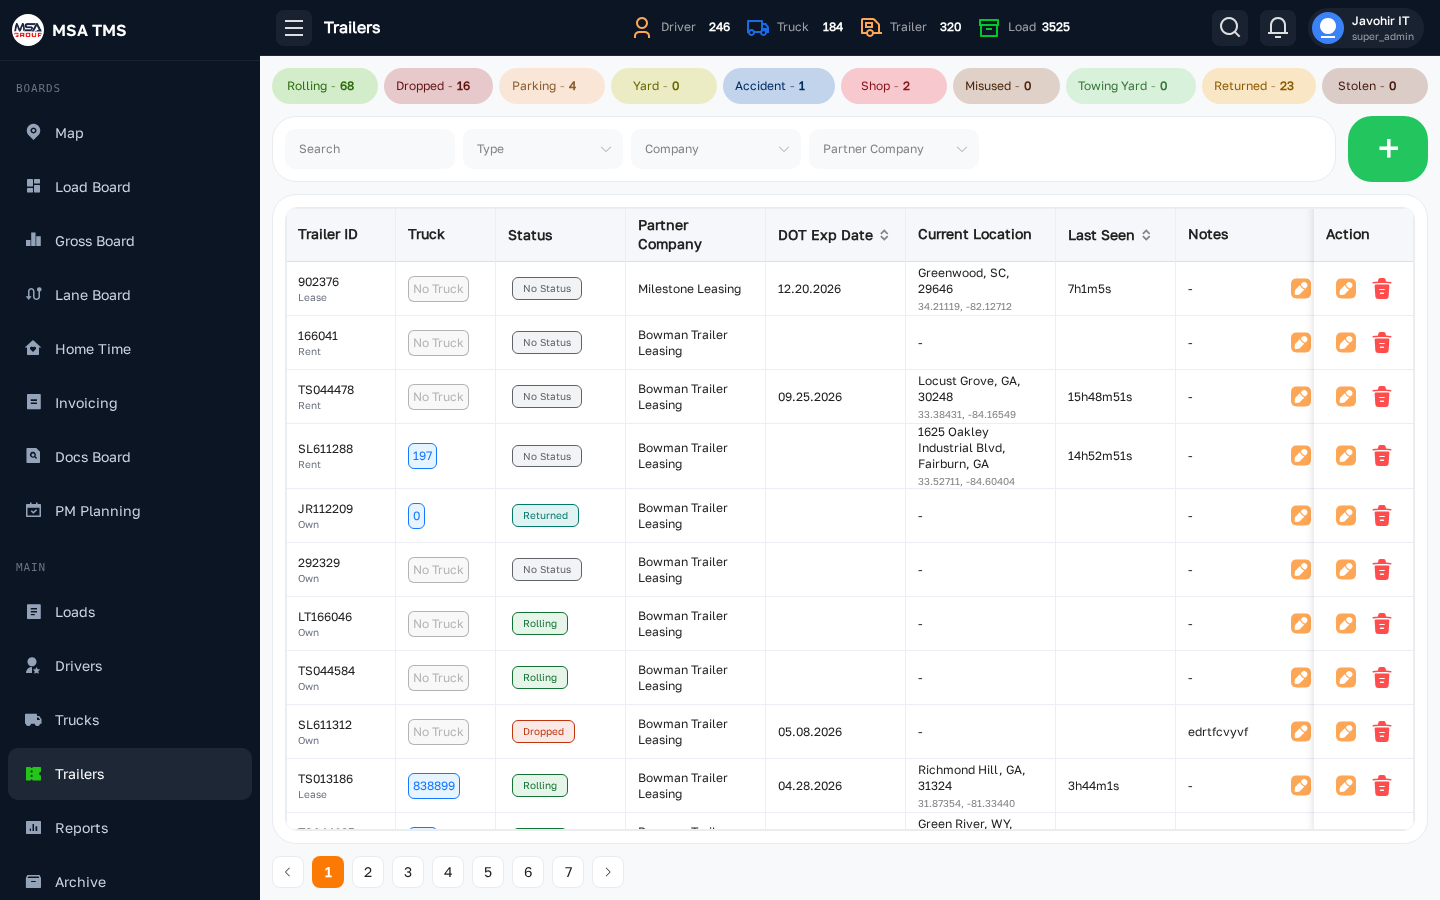
Every trailer in the fleet. Mirrors the Trucks page: VIN, plate, type (Dry Van, Reefer, Flatbed), ownership, current assignment, and documents.
- Use the Type filter to find an available Reefer for a temperature-controlled load.
- Trailer history shows which truck pulled it and when.
Reports
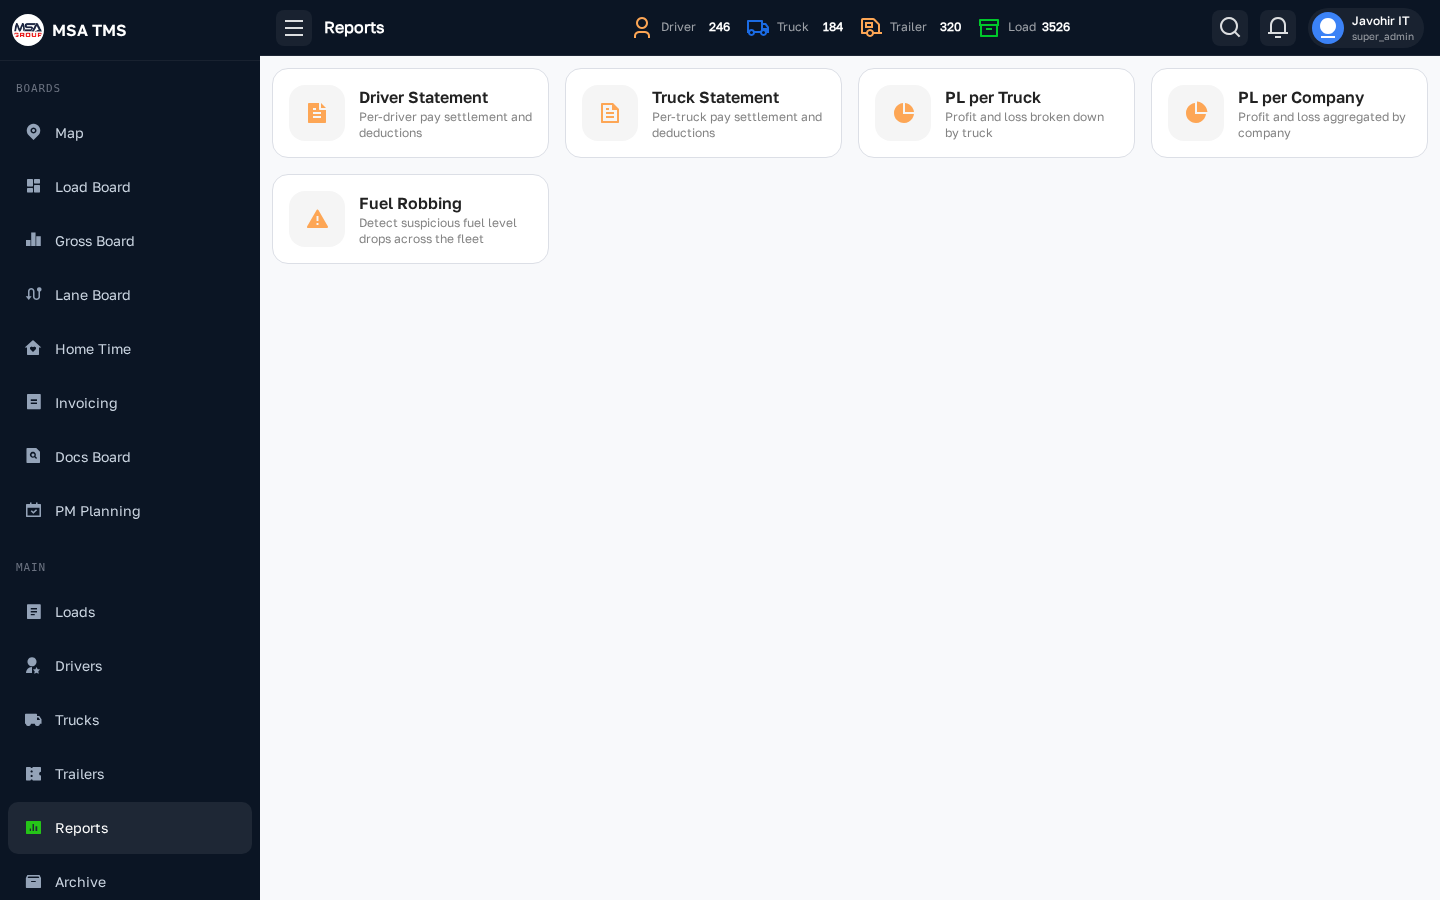
A hub of pre-built reports — driver pay, gross, dispatcher commission, broker analysis, lane analysis, and more. Pick a report card to open it, choose a date range, and export to Excel / PDF.
- Reports run against live data so they always match the current state.
- Save common filter sets as bookmarks (browser URL captures filter state).
Archive
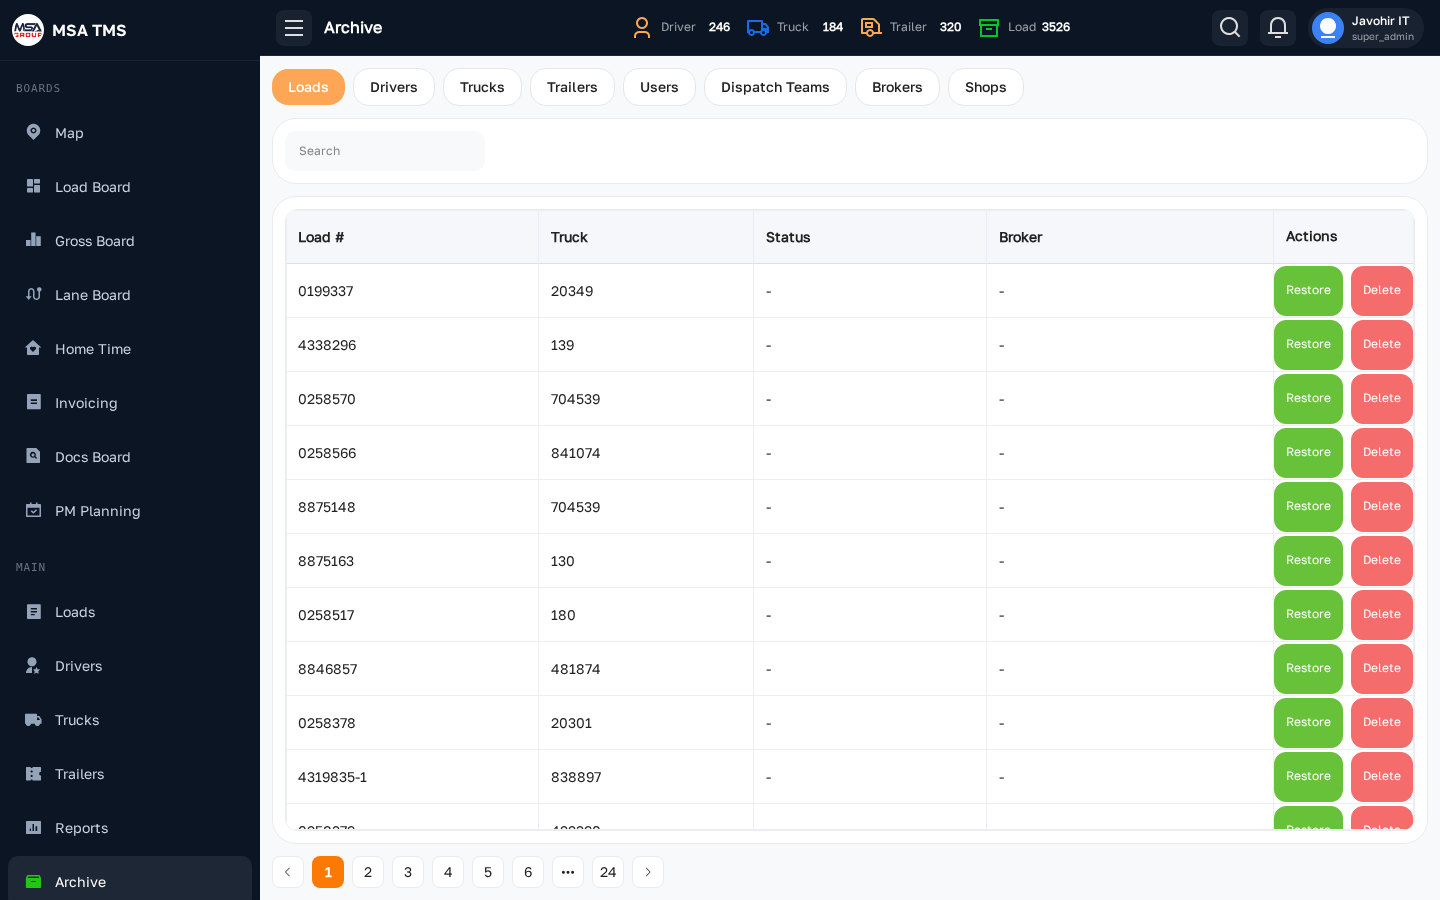
Where Closed loads go after you mark them. The Archive is read-only — open a load to review the final invoice and documents, but you can't edit financial figures. Use it during audits or to look up an old POD.
🚚 Dispatch
Dispatch Teams
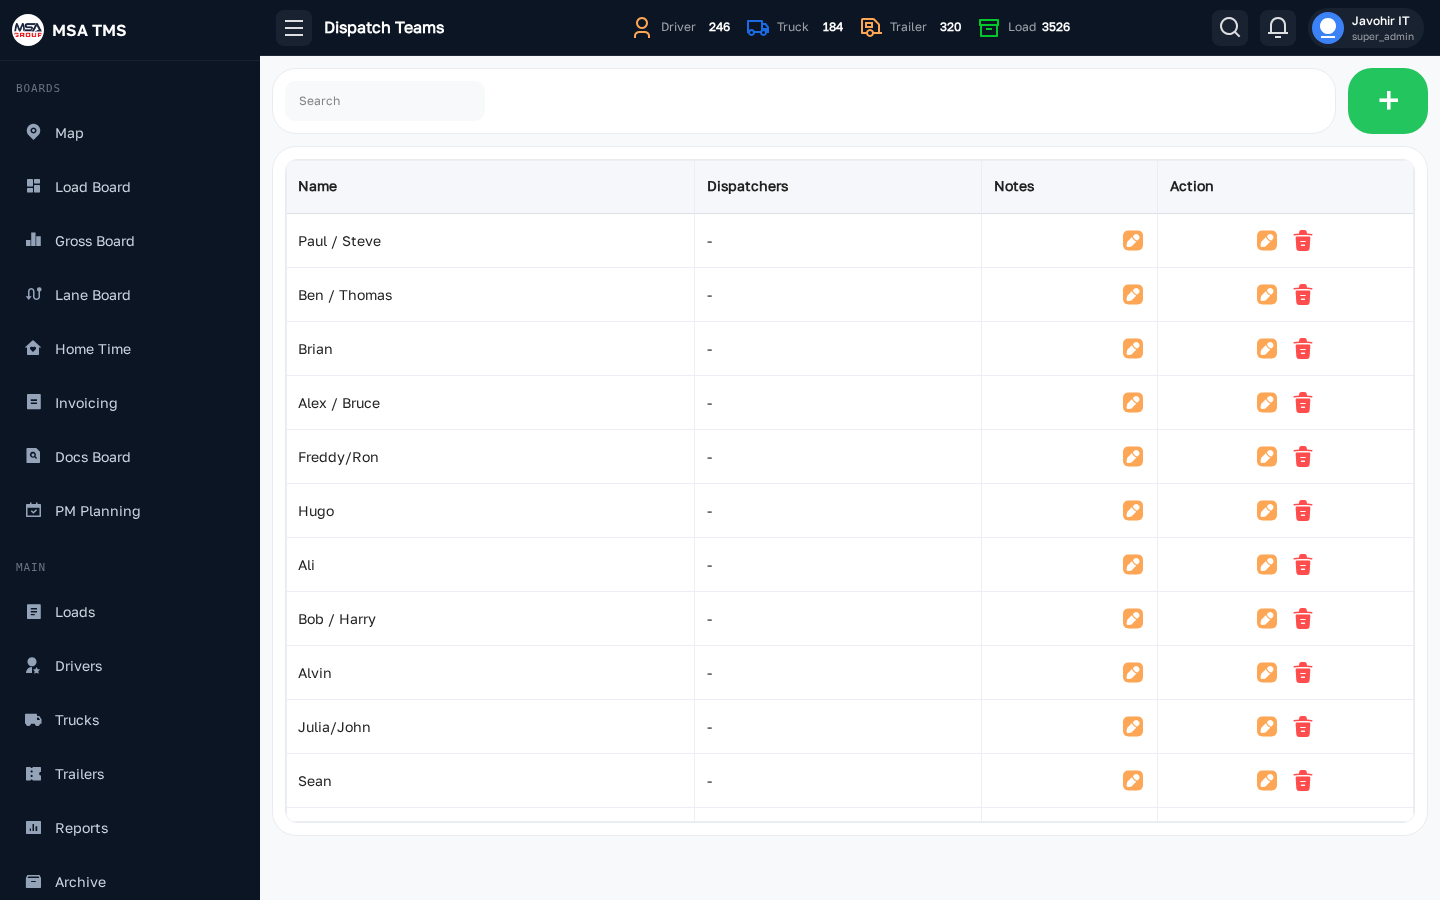
Group dispatchers into teams (e.g. Day Shift, Night Shift, Reefer Desk). Each team has members and the trucks/drivers they own. The team a load is dispatched by is what feeds the dispatcher-commission report.
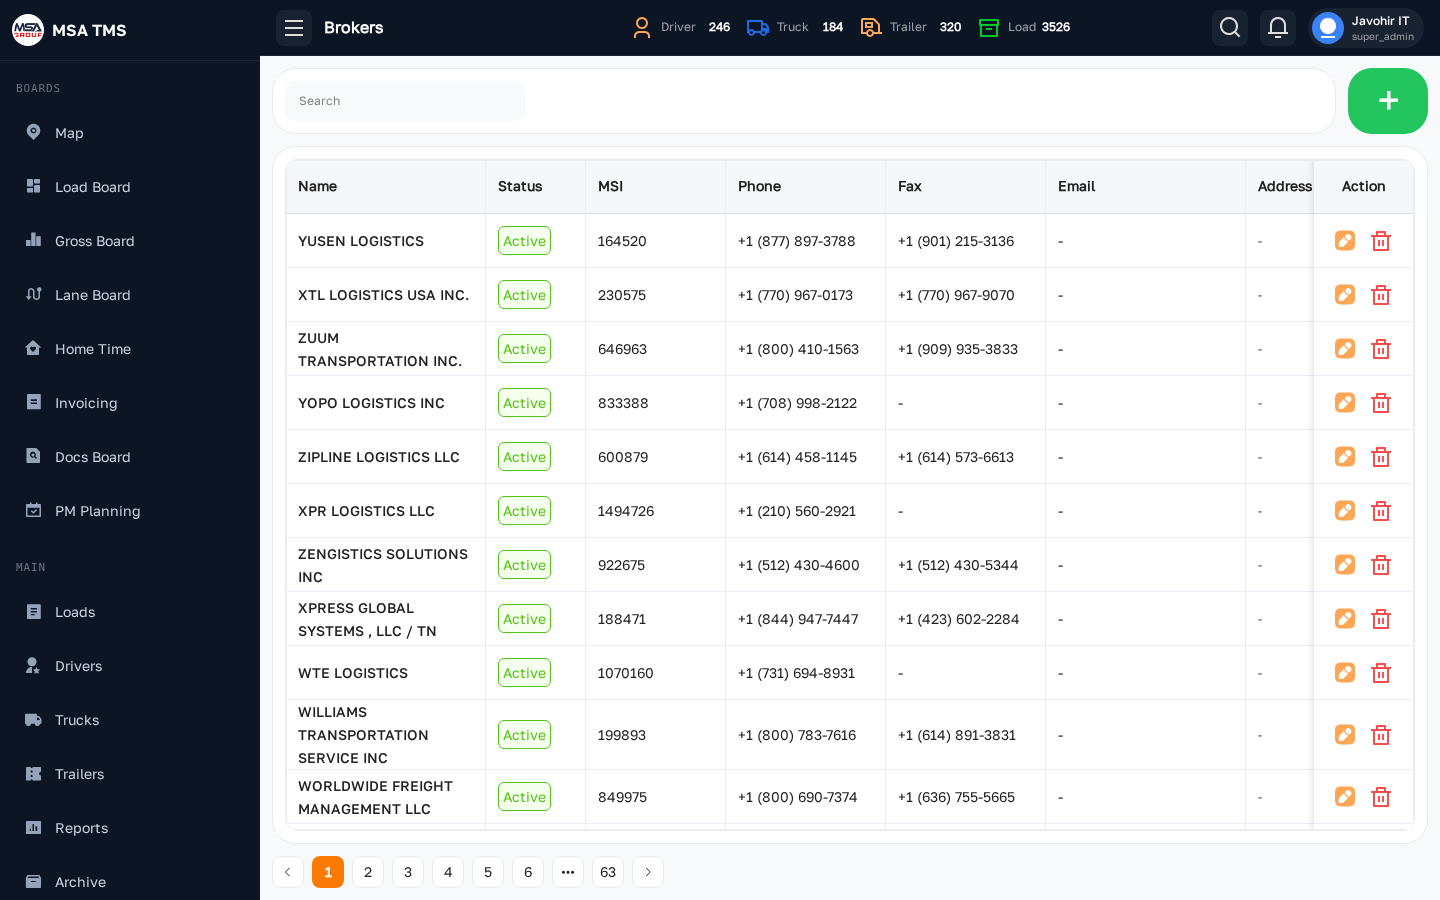
Brokers
The brokers and shippers you do business with. Each broker record stores MC number, contact info, factoring company, and rate history. When you create a load you pick a broker from this list.
- Use the + New broker button to add a brand-new partner.
- Open a broker to see every load you've ever run for them.
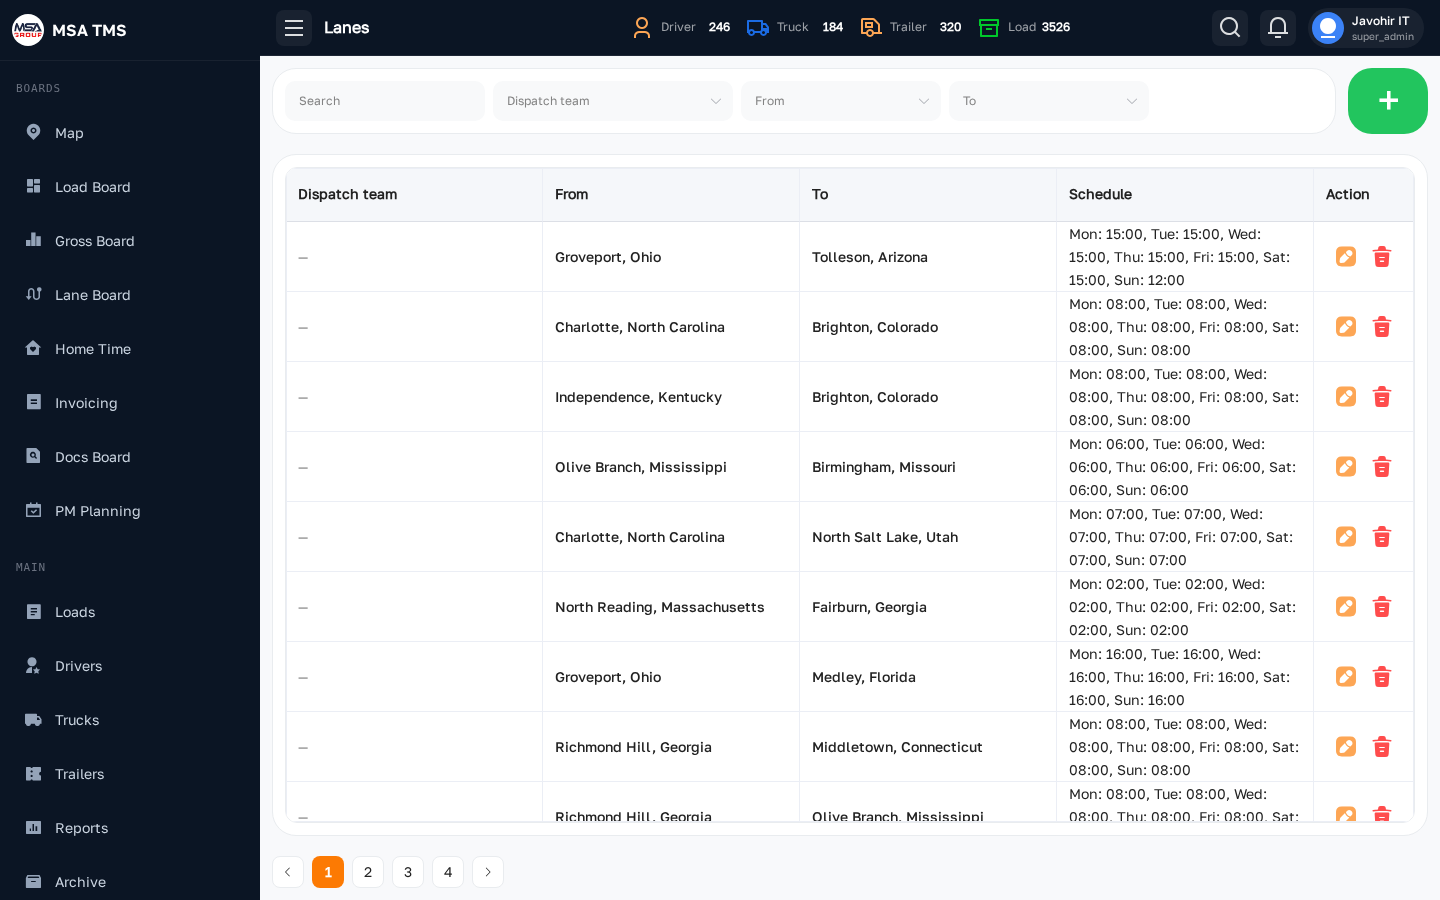
Lanes
Named lanes (origin → destination, e.g. ATL → MIA). Used both for reporting and as a quick pick when creating a load. Lanes link to recurring broker contracts.
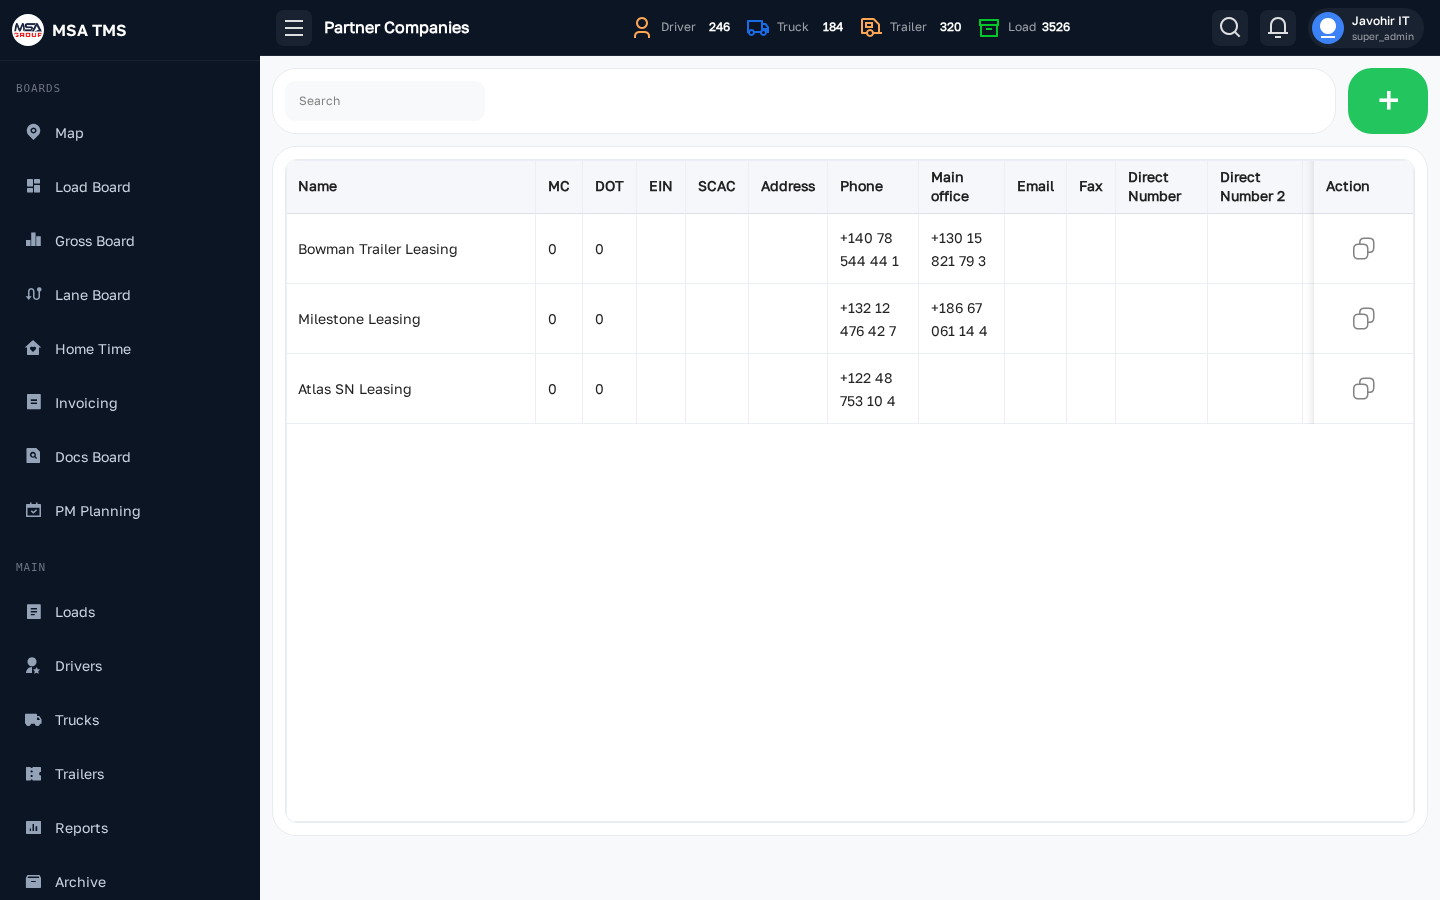
Partner Companies
Other carriers you partner with — outsourcing loads, leasing trucks, or running drop-and-hook arrangements. Each partner record stores their MC, COI, and the contact people you deal with.
🔧 Fleet
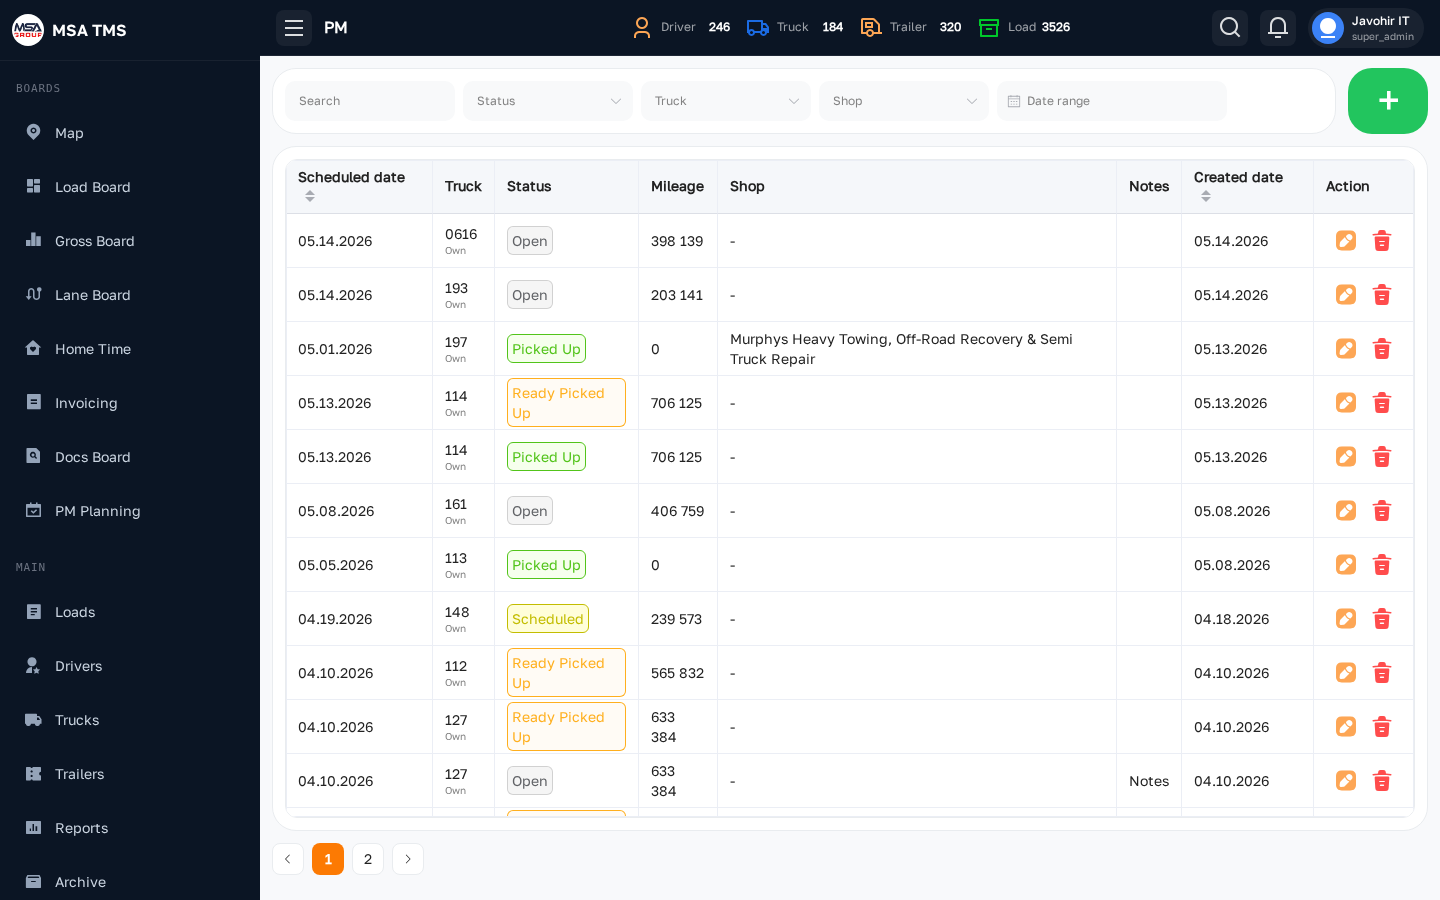
PM (Preventive Maintenance)
Scheduled maintenance for every truck and trailer. Each row shows the unit, the next due date or mileage, and the current state (Upcoming, Due, Overdue, Done).
- Click a row to open the PM record and mark it complete with cost and receipt.
- PMs feed both the PM Planning calendar and the unit expenses.
Repair
A live ticket of every truck or trailer currently in or recently out of the shop. Top tabs let you switch between Truck and Trailer. Filters on the right narrow by shop, mechanic, status (In Shop, Diagnosing, Done), and date.
- + New repair — opens a form to log a unit going to the shop.
- Attach photos and the shop's invoice; cost flows into Accounting.
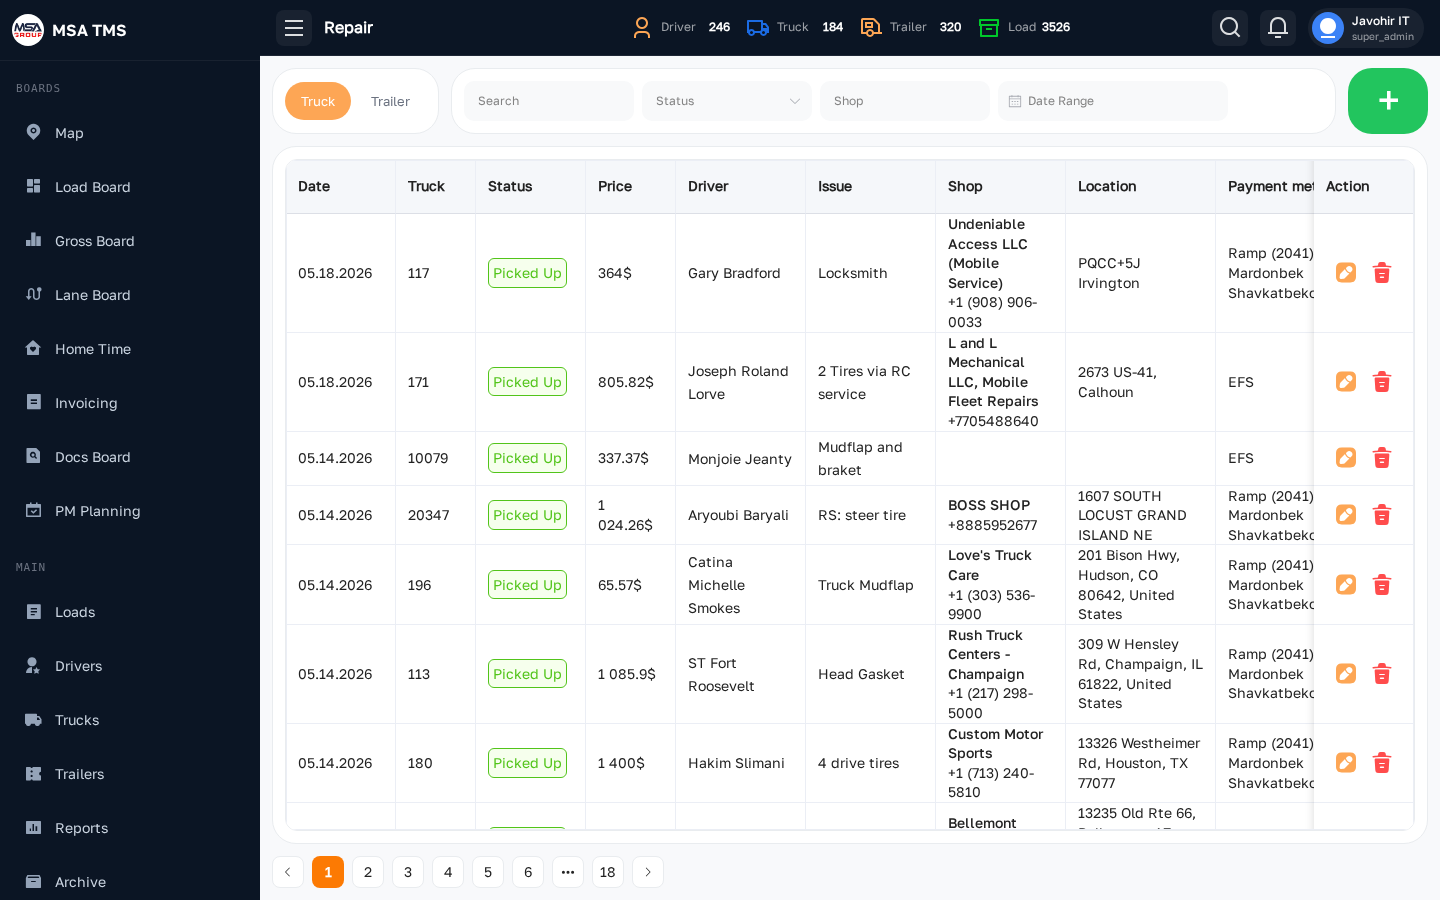
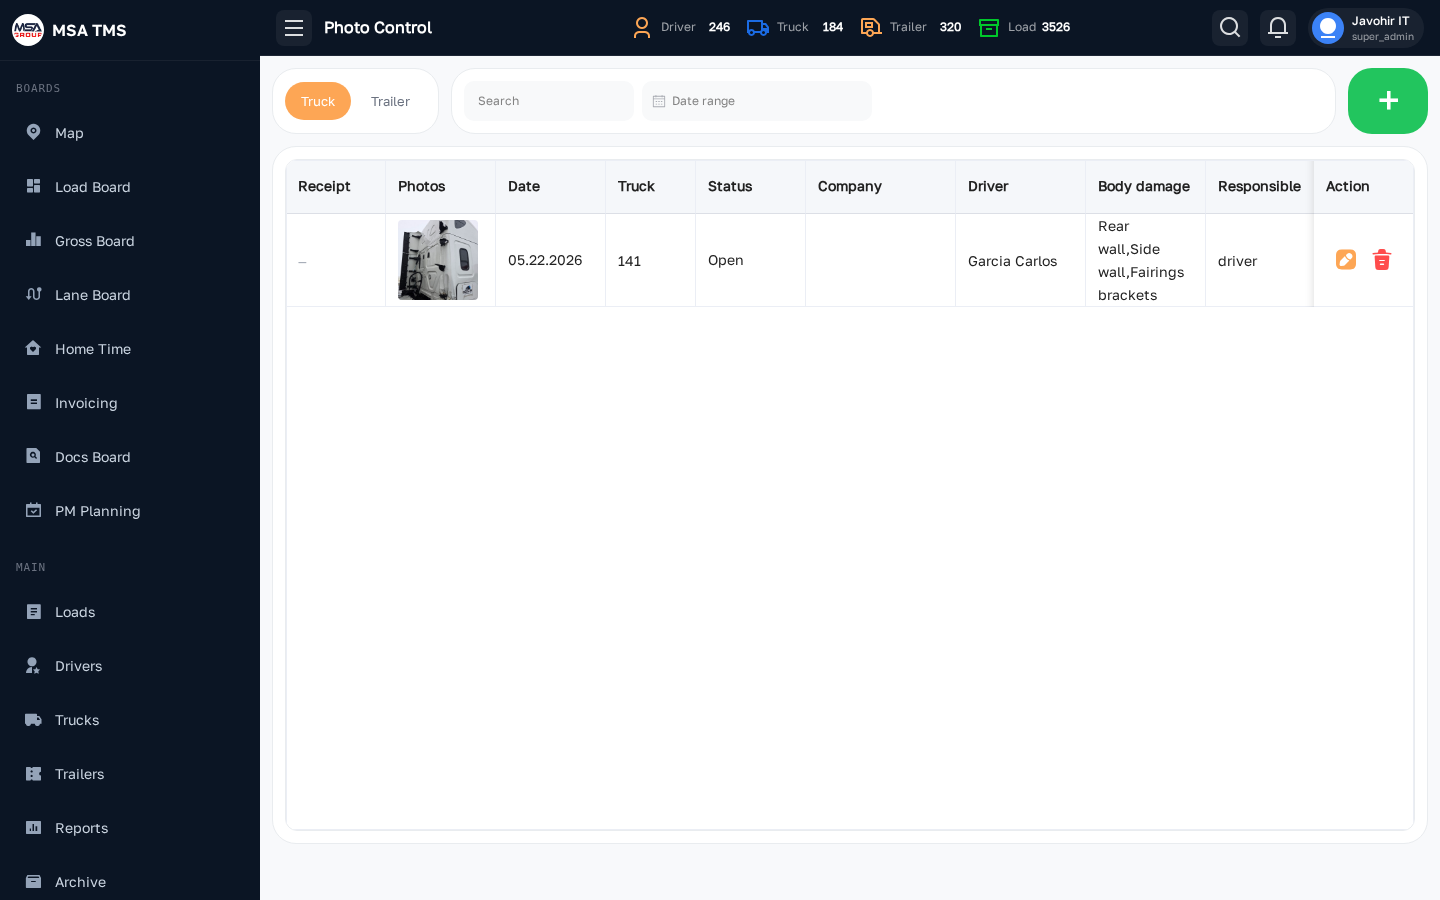
Photo Control
Drivers upload photos of the truck and trailer (interior, exterior, tires) at regular intervals. Photo Control is where Safety and Fleet review those submissions, flag issues, and follow up with the driver.
- Filter by date and driver to spot drivers who missed a check.
- Use the inline approve/reject buttons; comments are visible to the driver.
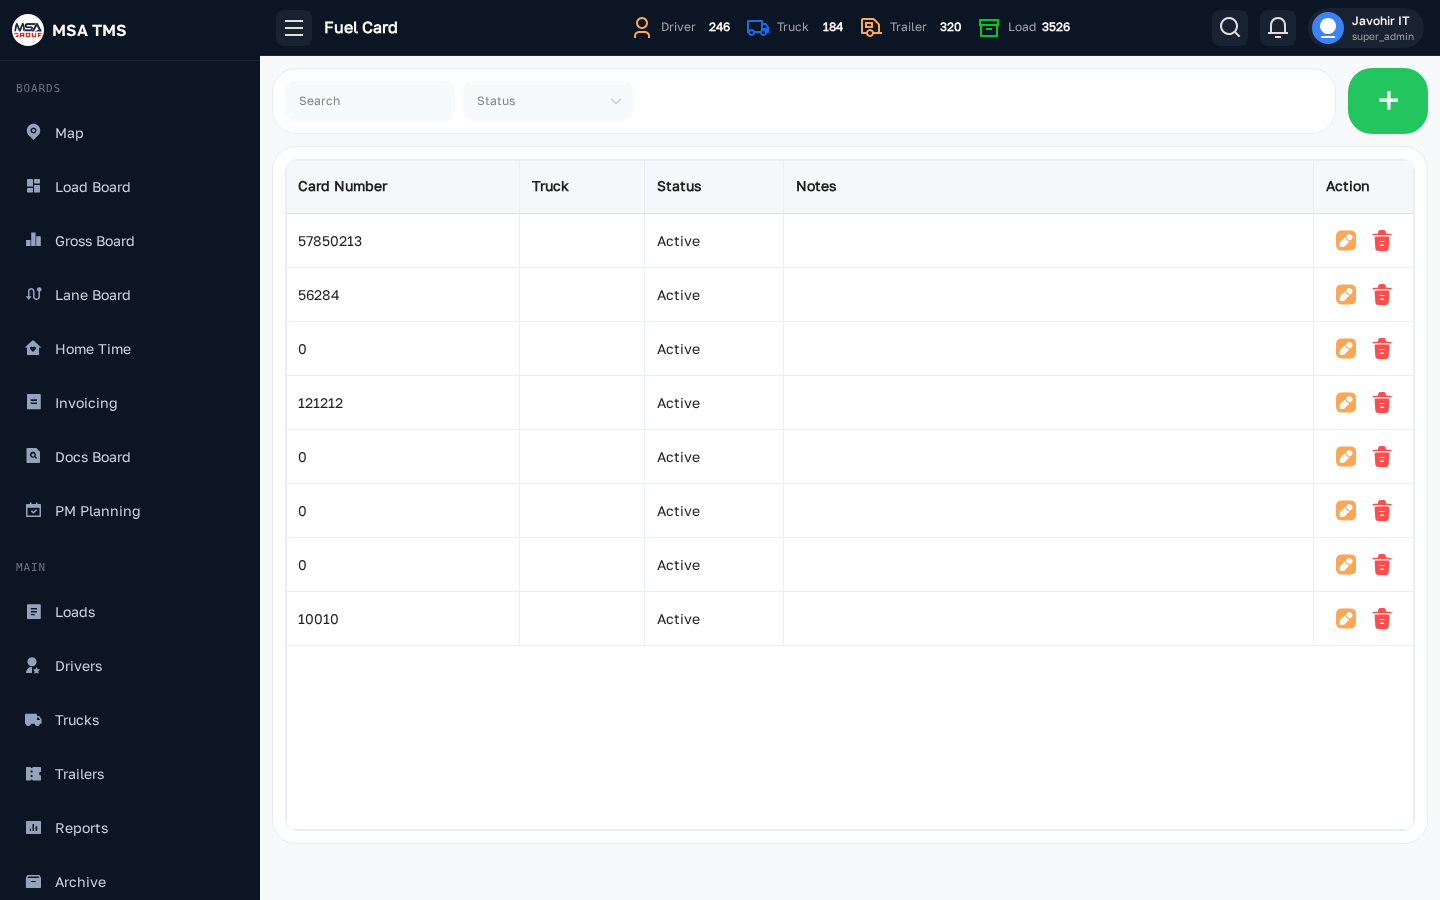
Fuel Card
Manage the fleet's fuel cards (e.g. EFS, Comdata). Each card record links to a truck and a driver. Transactions imported from the fuel-card provider show here and feed Accounting → Fuel.
- Issue, deactivate, or replace a card.
- Set per-card daily or weekly spending limits.
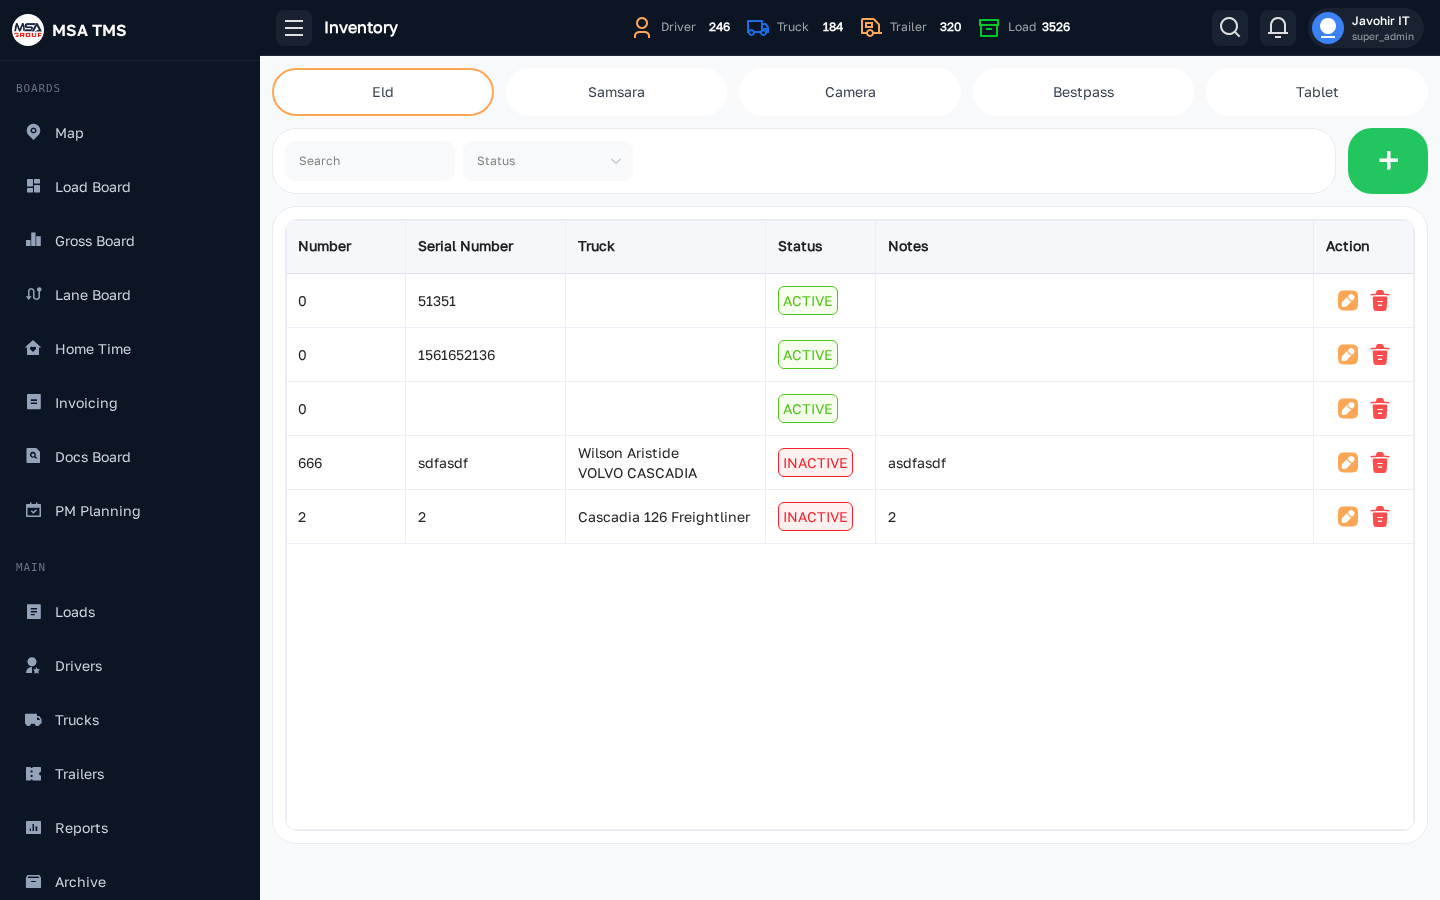
Inventory
Parts and supplies on hand at your shop (filters, brake pads, tires, fluids). Use inventory to track what you have so a repair can be costed against it instead of always buying new.
Repair Shops
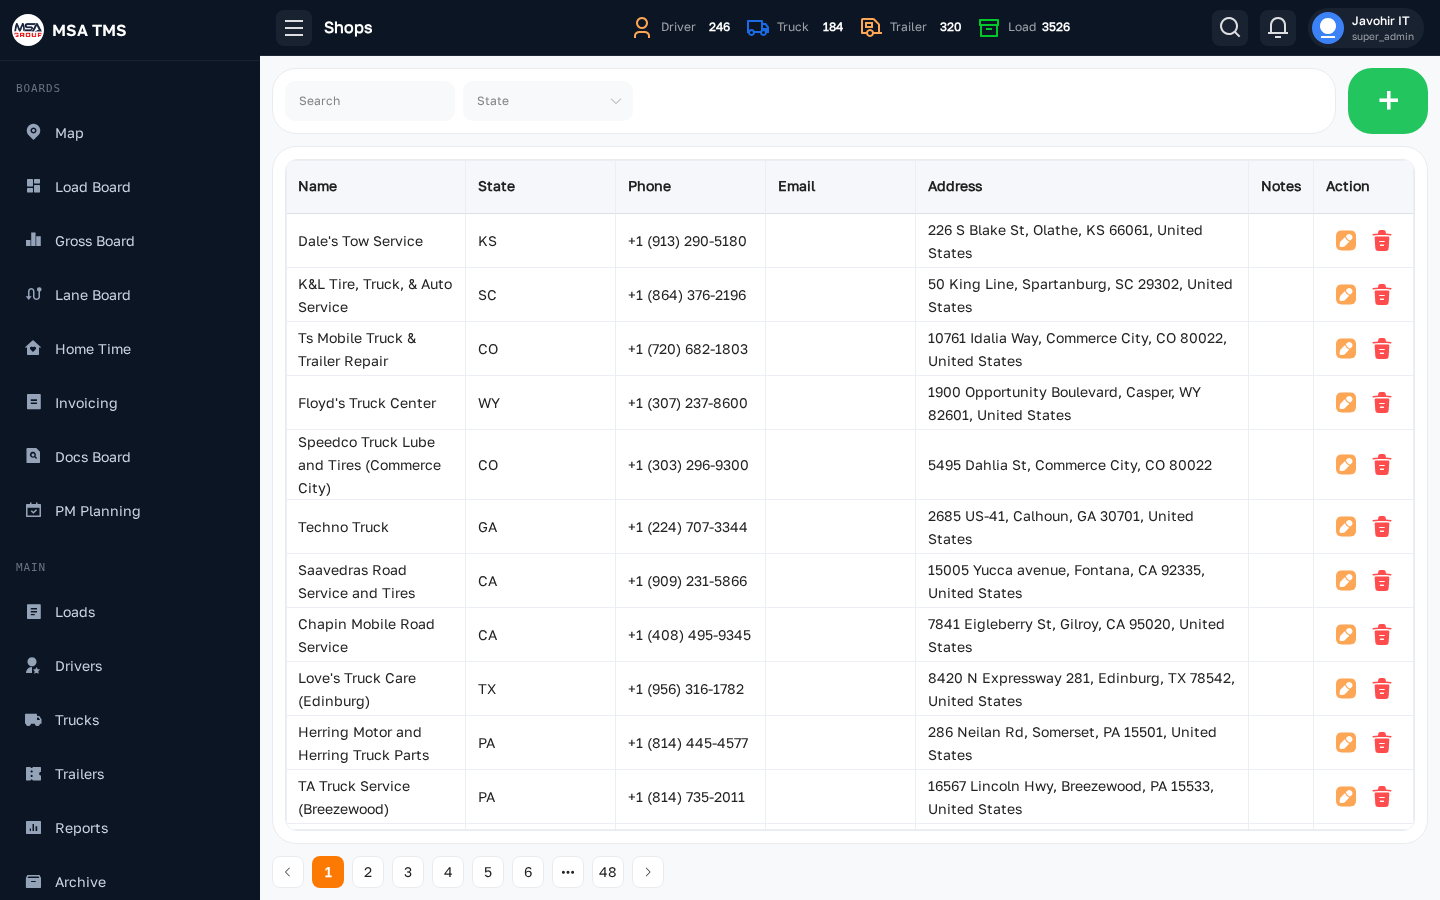
The directory of shops you use — in-house and 3rd-party. Each record stores address, contact, accepted payment methods, and labour rate. New repair tickets pick a shop from this list.
💵 Accounting
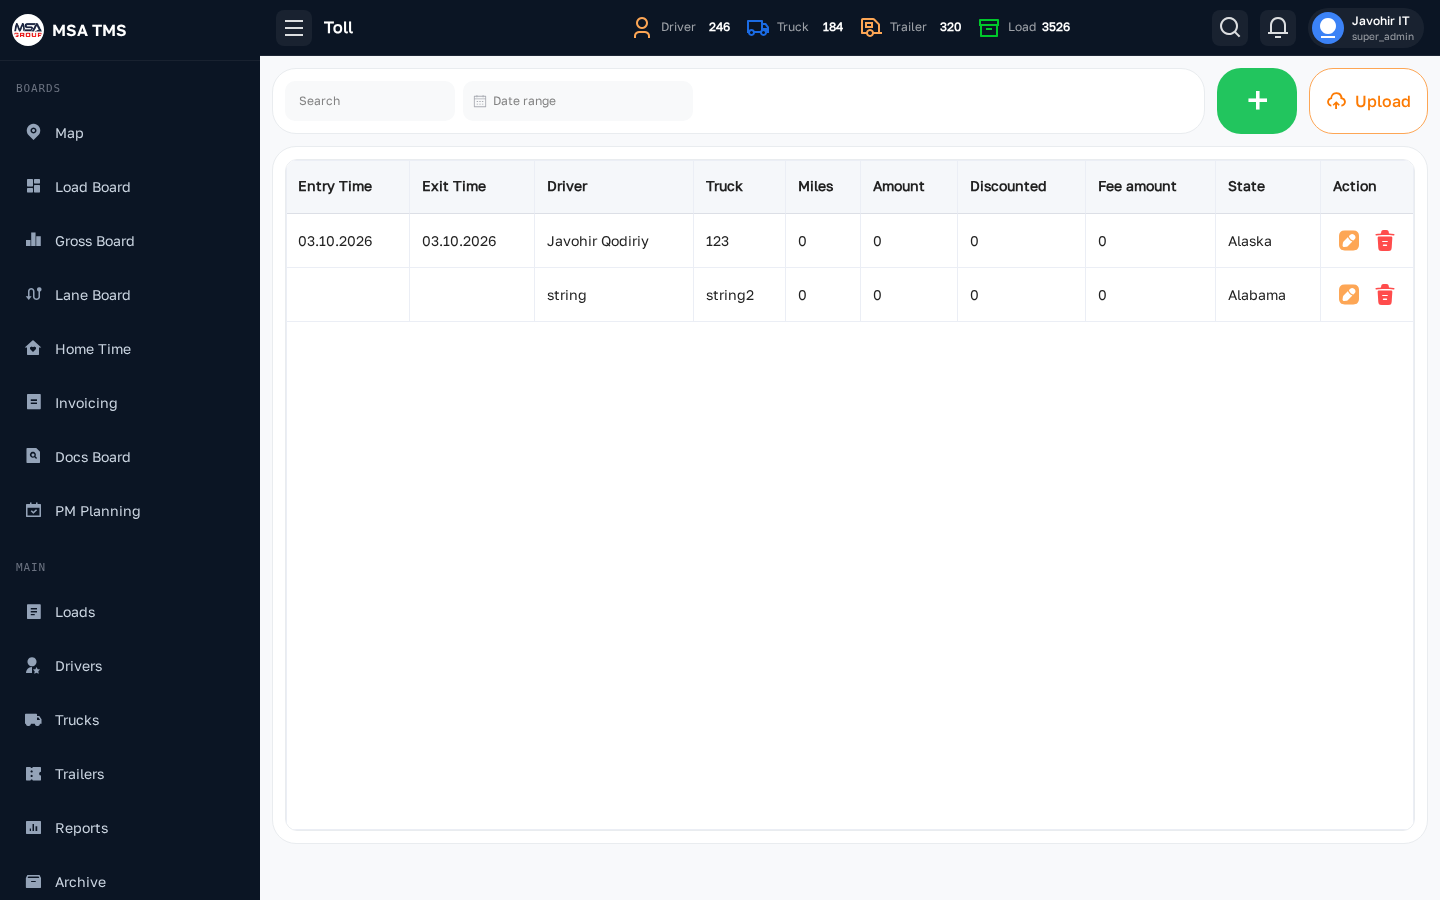
Toll
Toll transactions imported from Bestpass (and similar). Each row shows toll amount, lane, transponder, truck, and the load it should be billed against.
- Reassign a toll to a different load if it was auto-matched incorrectly.
- Export selected rows for reconciliation.
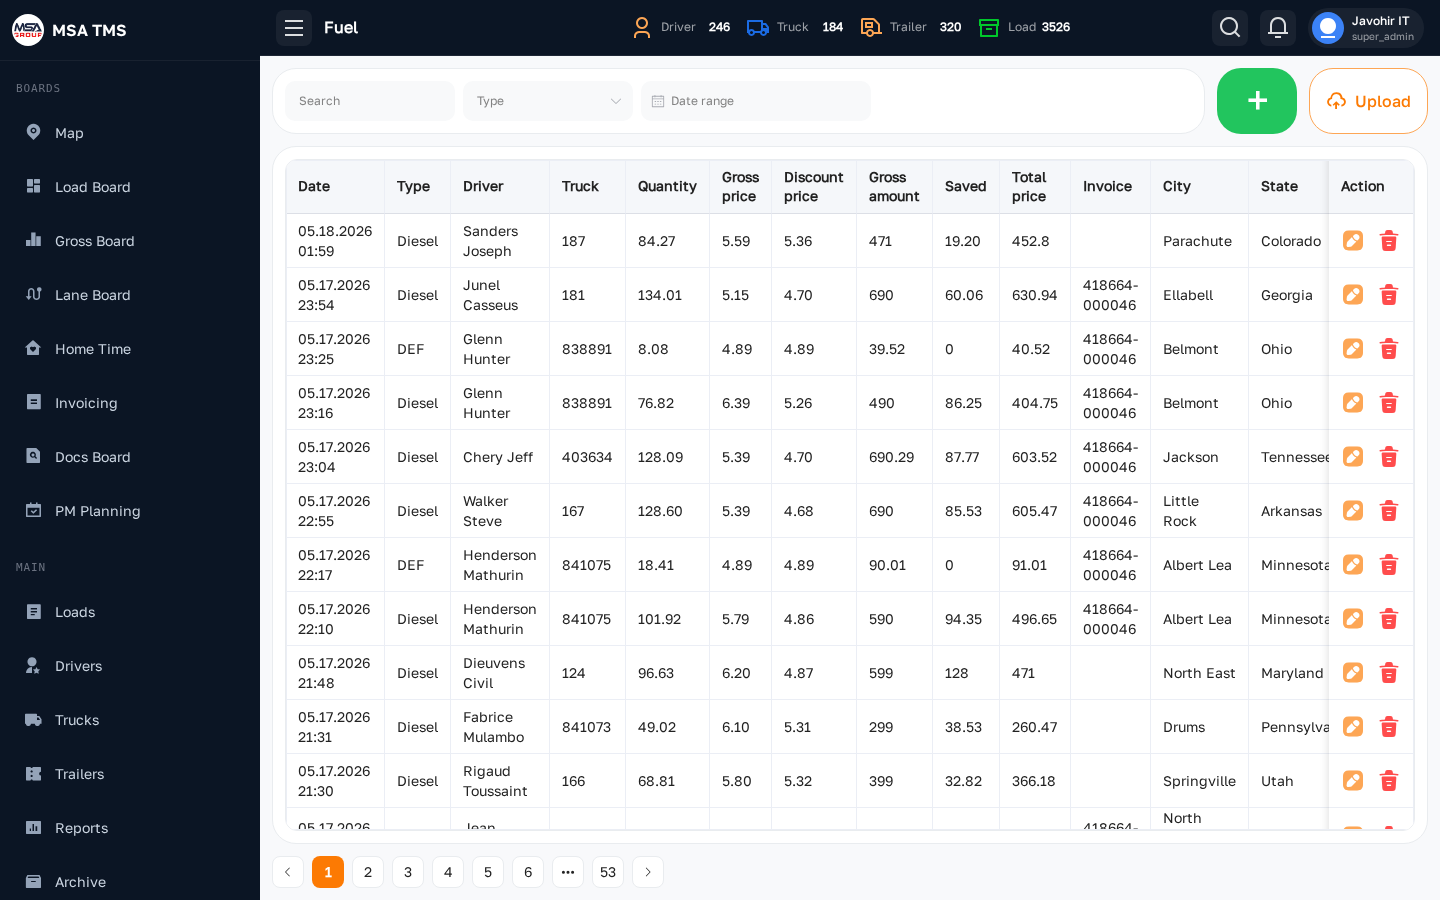
Fuel
Fuel-card transactions, joined to drivers and trucks. Use it to spot anomalous spending (volume way above typical, unfamiliar location, mismatched truck).
- Filter by truck, driver, card, or location.
- Click a row to see the transaction in detail (gallons, price/gal, MPG).
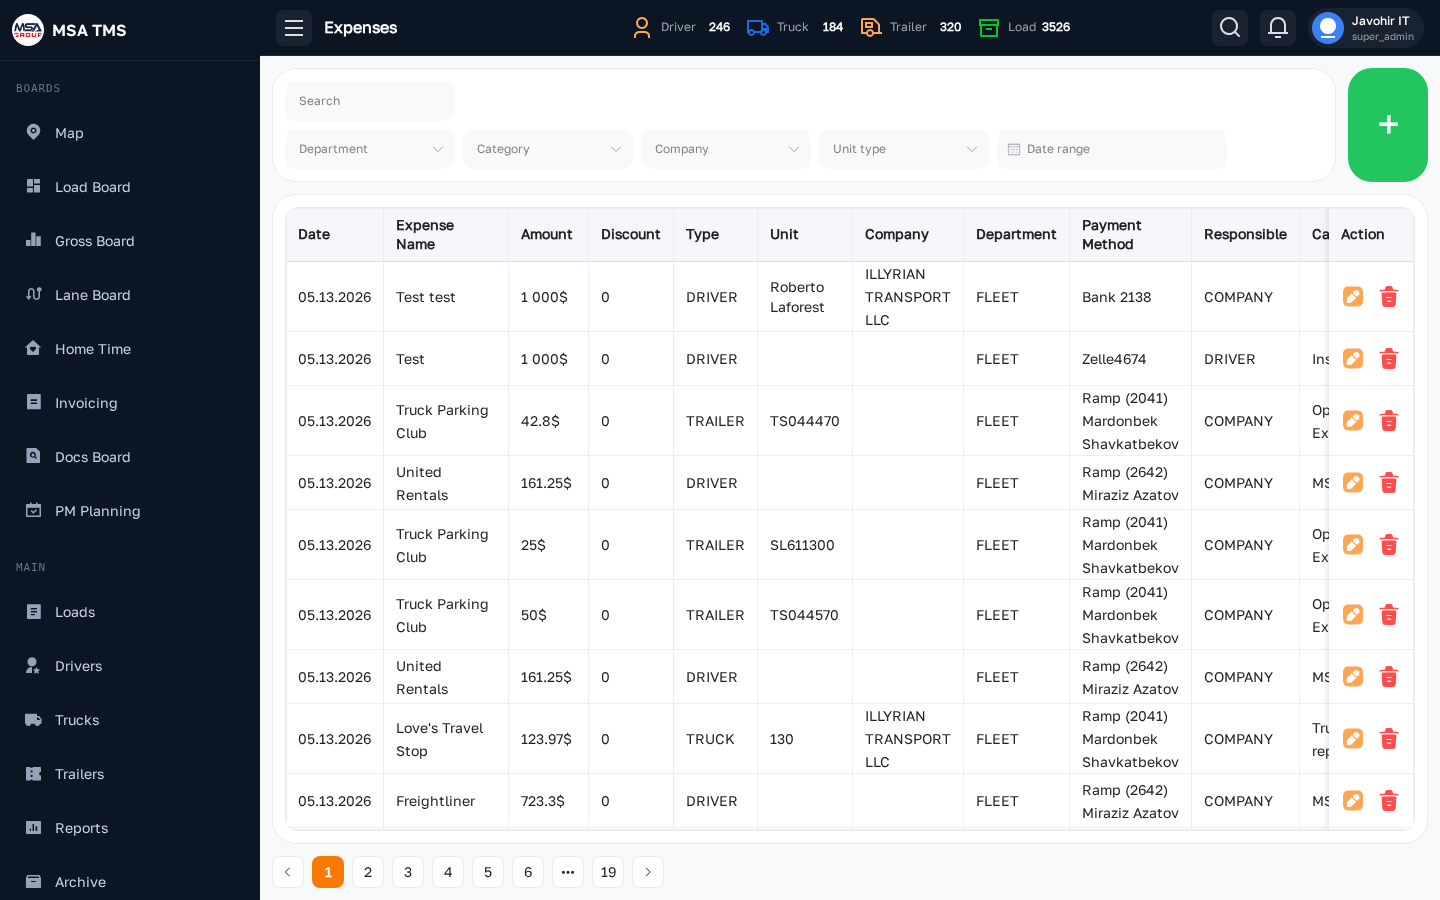
Expenses
The catch-all expenses ledger — anything that isn't a toll or a fuel-card swipe (Bestpass fees, IFTA, registration, deductions, etc.). Each line has an expense category, an amount, a date, and is attached to a truck, trailer, or driver.
- Add a new expense from the top-right button.
- Categories are managed in Settings → Expenses Categories.
🛡️ Safety
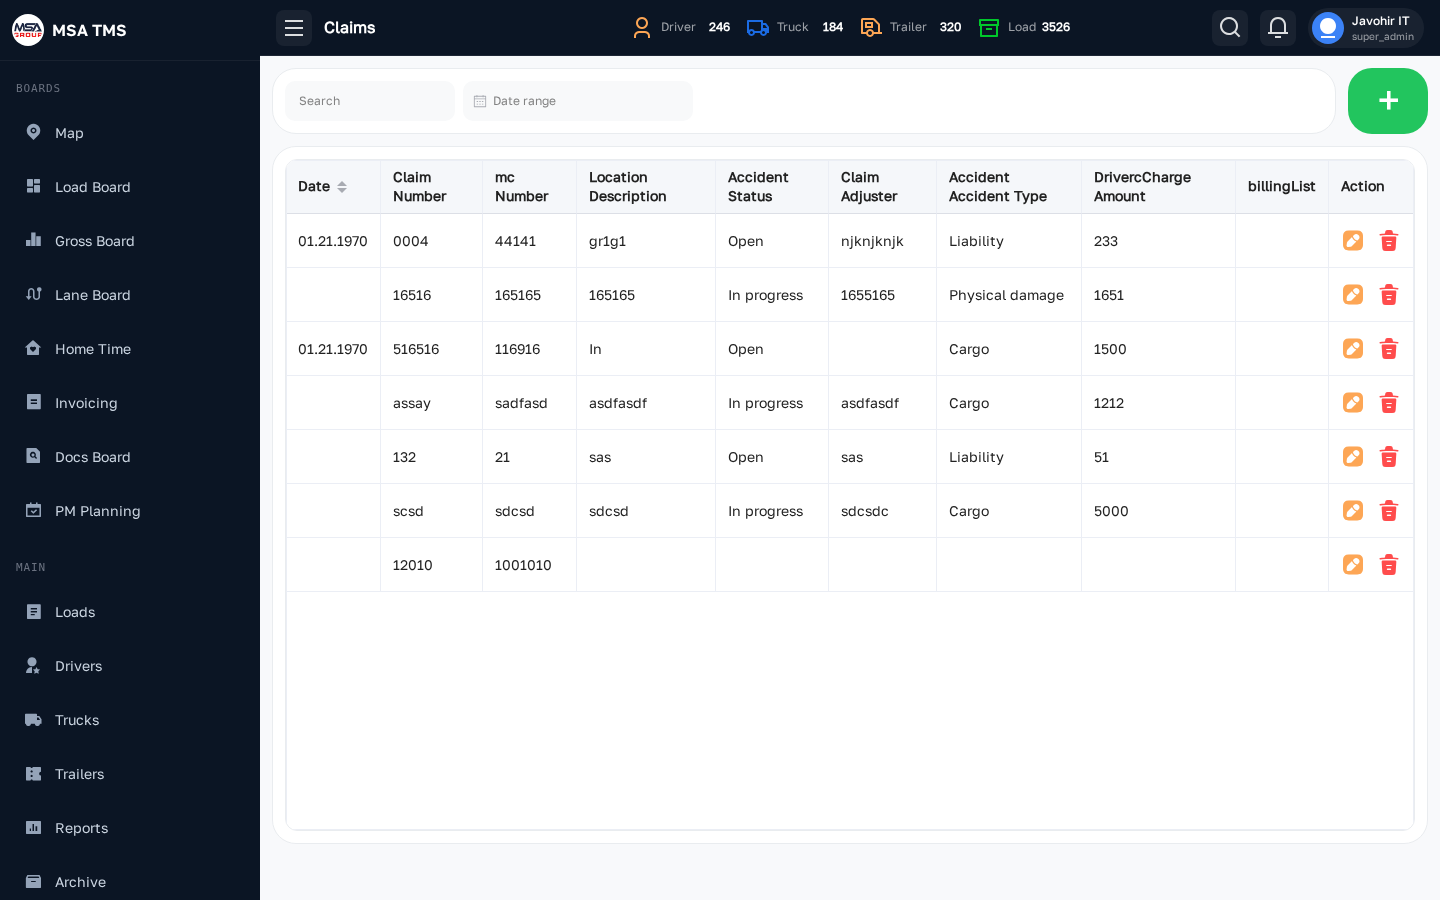
Claims
The accident / cargo-claim register. Each claim record holds the date, location, driver, truck, photos, police report, the broker's claim number, and the cost.
- Use the status workflow (Open → Investigating → Settled / Denied) to track resolution.
- Closed claims feed driver scorecards and insurance reporting.
⚙️ Settings
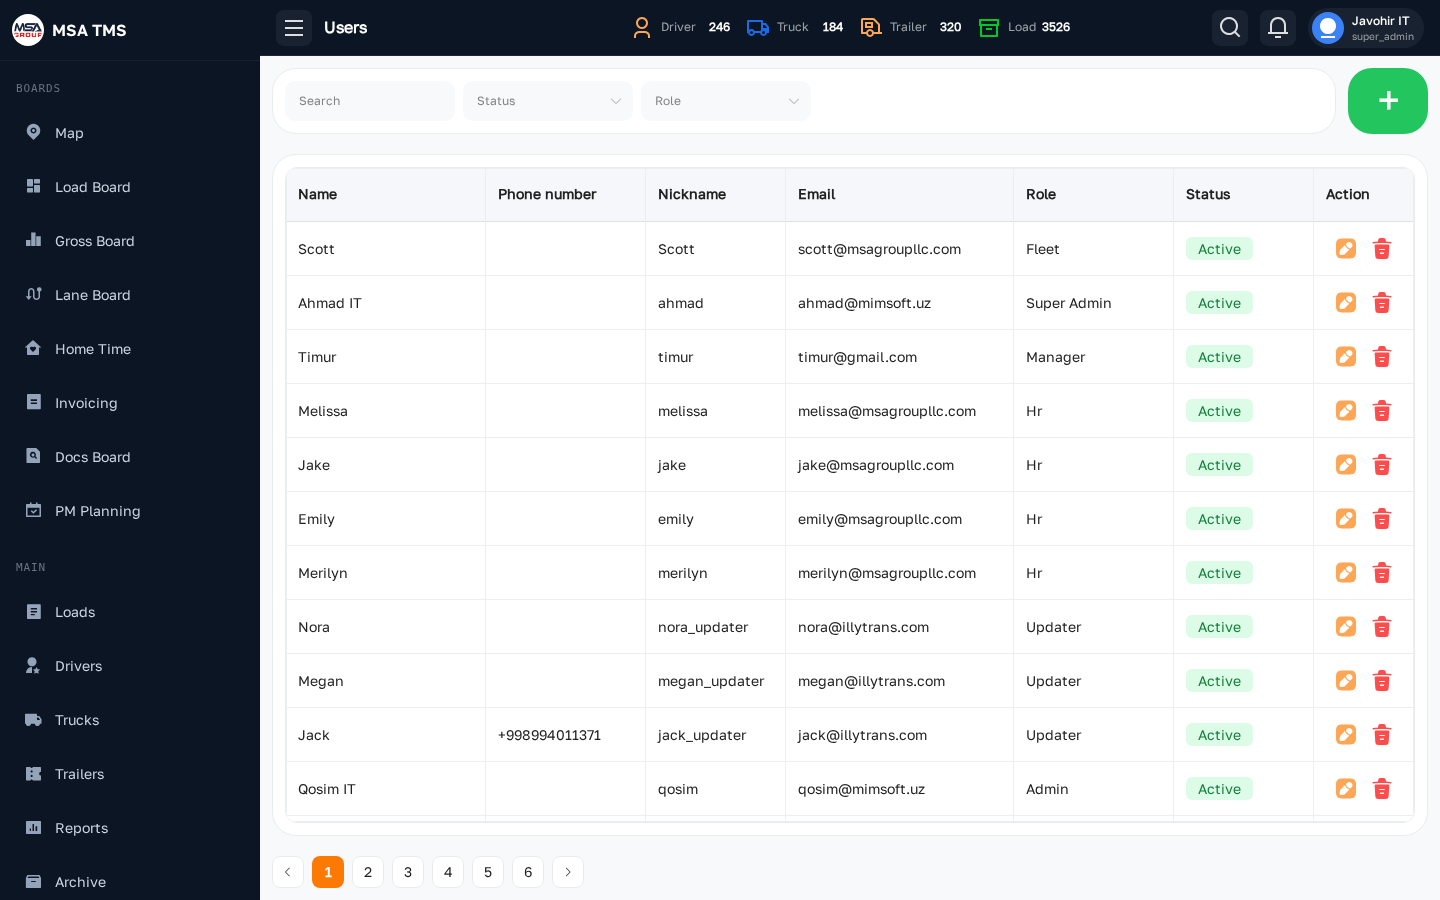
Users
Manage everyone who can log in: name, email, role, dispatcher team, status. Only
users with the SETTINGS_USERS_VIEW permission see this page.
- + New user — invite a new teammate.
- Click a user to edit their role, reset password, or deactivate them.
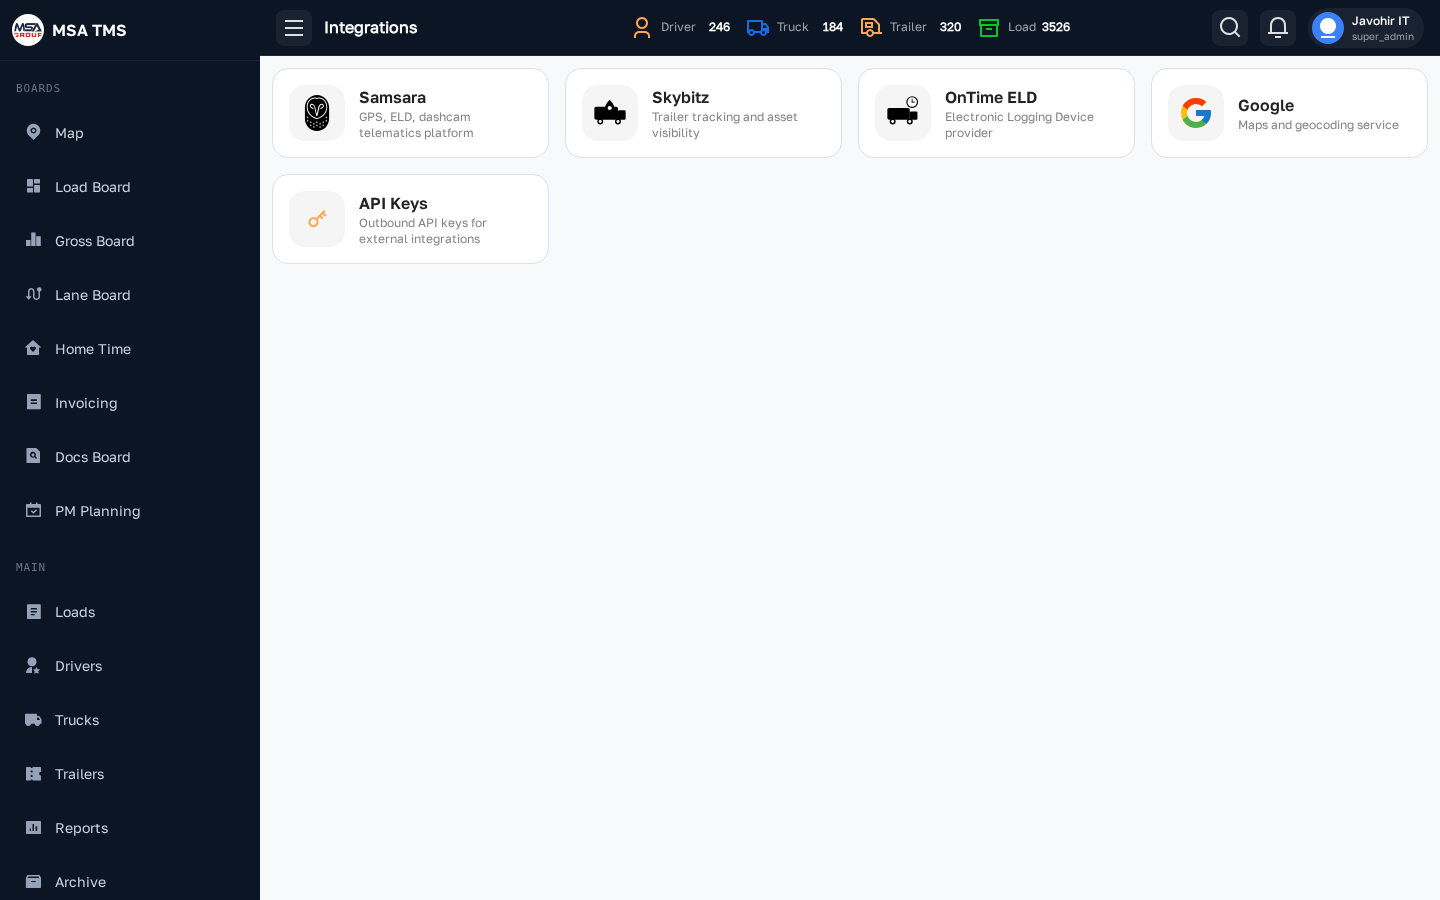
Integrations
Third-party integrations the carrier uses. The card grid surfaces Samsara, Azuga, SkyBitz, Bestpass, ELD providers, and Gemini. Each card opens its own settings screen where you paste in API keys and toggle features.
- Once configured, integrations populate the Map, Fuel Card, Toll, and similar pages automatically.
- Use the Test connection button on each card before saving.
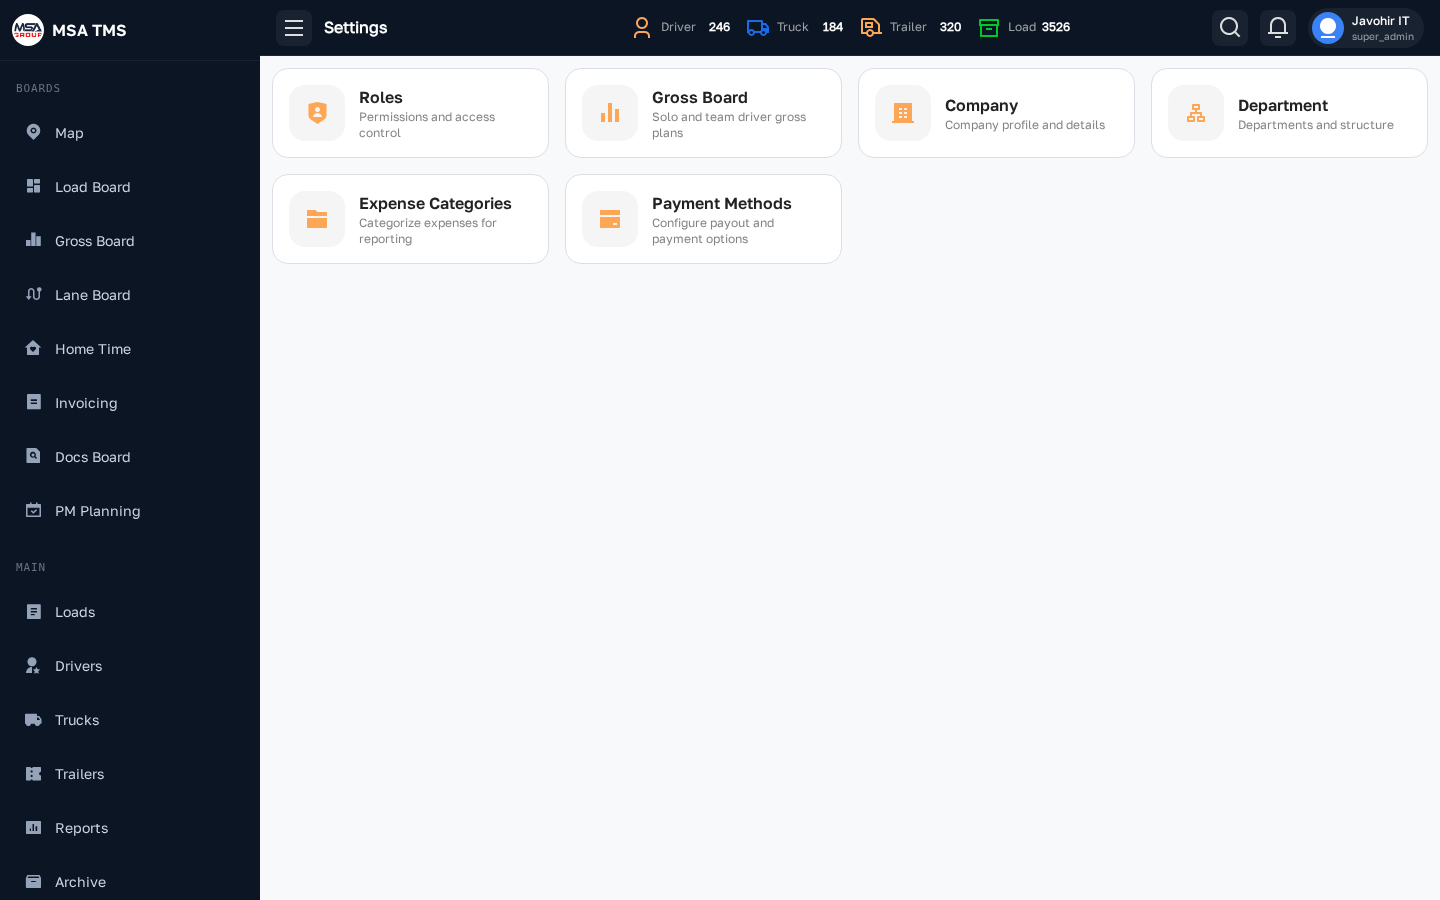
Settings hub
The catch-all settings grid. Each card opens a sub-page:
- Roles — define permission sets that get assigned to users.
- Companies — your own legal entities (DBAs / MCs).
- Departments — internal org chart used for routing and reports.
- Expenses Categories — the taxonomy used in Accounting → Expenses.
- Payment methods — ACH, Wire, Check, etc., used on broker invoices.
- Gross Board settings — the threshold colours and rules for the Gross Board.
📖 Reference
Load statuses
Every load in the system carries one of these statuses. Colours and meanings are consistent across the Load Board, Loads list, Invoicing Board, and all Reports. To change a load's status, open the load detail and click the coloured status chip on the left panel — the status picker slides in from the right.
Upcoming
The load has been booked, a driver has been assigned, and the RC is in place — but the freight has not yet been picked up. The driver is either en route to the shipper or waiting for a pickup appointment. This is the starting status for every new load. All paperwork should be confirmed and the driver briefed before the status moves forward.
En Route
The driver has picked up the freight at the origin facility, collected the signed BOL, and is actively driving toward the destination. Set this status as soon as the driver confirms pickup. The load stays En Route until the driver arrives at the destination and completes delivery.
On Hold
The load is temporarily paused — it is neither moving nor cancelled. Common reasons: the broker changed the pickup appointment and the driver is waiting for a new time; the driver had a breakdown and a replacement is being arranged; the shipper postponed the load without cancelling it. Use On Hold to flag to the team that this load needs attention before it can proceed. Always leave a note explaining why it is on hold.
Delivered
The freight has been delivered to the consignee and the driver has collected the signed POD. Set this status as soon as delivery is confirmed. Delivered loads appear in the Invoicing Board — this is the signal for accounting to begin the invoicing process. Upload the POD to the Documents tab before the load is invoiced.
Rejected
The broker offered the load but withdrew it — or the carrier declined the offer — before a driver was dispatched. No freight was moved and no revenue was earned. Rejected loads are retained in the system for record-keeping but do not appear on the Invoicing Board or feed the Gross Board.
Cancelled
The load was accepted and may have been scheduled or partially started, but was pulled off the board before completion — by either the carrier or the broker. A cancellation fee (TONU — Truck Order Not Used) may be owed by the broker. If so, record it in the load's Extra Bill field before closing the load.
Closed
The load has been fully invoiced and financially reconciled. Once closed, the load moves to Archive and its financial fields (Rate, Extra Bill) are locked against editing. Only admin-level users can re-open a Closed load. Use Archive to look up old invoices, PODs, or audit data.
On Hold can appear between any two statuses.
Rejected and Cancelled are terminal — they do not progress further.
Permissions, in short
Permissions are resource-based — for each resource (Loads, Drivers, Trucks, Brokers, Fuel Cards, …) a role can have VIEW, ADD, EDIT, and DELETE rights independently.
The sidebar groups and buttons you see are filtered by permissions. If a screen or button is missing, ask an admin to grant the appropriate resource on your role under Settings → Roles.
FAQ
I don't see a sidebar item I used to have.
Your role's permission for that resource was removed. Speak to an admin who can update your role under Settings → Users / Roles.
The page won't load — it spins forever.
Check your internet connection first. The app needs to reach
api.tms.msagroupllc.com. If that's blocked by your network, the app will
route you to a maintenance page. A hard refresh
(Ctrl+Shift+R) clears most stuck states.
I edited something but the change doesn't show up.
The edit drawers send a partial update — the change is saved on the server, but you may need to re-load the page to see it propagate to other widgets (e.g. the Gross Board cache).
How do I switch carrier?
Log out and log back in. If your account belongs to multiple carriers, the picker shows up after you enter your password.
How do I reset my password?
Click Forgot password? on the login screen. You'll receive an email with a reset link. Reset links expire in 24 hours.
Which browser is supported?
Recent Chrome, Edge, Safari, or Firefox. The app uses modern JavaScript and may misbehave on Internet Explorer or very old releases.